 Xtractor
Manual imports of checks and expenses can cost small accounting teams 8–12 hours per week in copying, field mapping, and error correction. This QuickBooks Online New Layout import Excel guide on our site shows how to import Checks and Expenses from Excel into QuickBooks Online New Layout using xtractor.app, including mapping, saved presets, validation, and automation. xtractor.app is an email parsing and data-extraction tool that pulls structured text from emails and exports it to Google Sheets, CSV, or Excel. Use one-click bulk import, custom filters, multiple parsing contexts, and scheduling to produce clean spreadsheets ready for QuickBooks and reduce manual fixes. Want to see the exact mapping and saved-preset that prevents duplicate vendor charges?
What prerequisites and files do I need to import Excel into the QuickBooks Online New Layout?
You need a clean XLSX or CSV file with column headers that match QuickBooks import fields and an admin user with Import access in the New Layout. Our guide shows which headers QuickBooks expects, how to export a consistent spreadsheet from xtractor.app, and the account and company settings you must confirm before importing.
Required file formats and common field headers 📄
QuickBooks Online New Layout accepts XLSX and CSV for transaction imports. XLSX preserves cell formatting (dates, leading zeros) and formulas while CSV provides a plain-text option that integrates better with automation pipelines. Use these common headers so QuickBooks maps fields predictably:
- Payee (vendor/customer name)
- Date (use consistent format such as MM/DD/YYYY or YYYY-MM-DD)
- Amount (use positive values for expenses; avoid currency symbols inside the cell)
- Account (exact expense or bank account name as it appears in QBO)
- Memo (optional free text)
- Location (if you track locations in QBO)
- Class (if you track classes in QBO)
- Transaction ID (optional but recommended for duplicate protection)
Include only one header row and remove hidden columns. If you export from xtractor.app, save the parsing context so headers remain consistent across exports and match these names for faster mapping.
How to export parsed email data from xtractor.app to Excel 📥
Xtractor.app exports parsed email data directly to XLSX, CSV, or Google Sheets using saved parsing contexts and one-click bulk export. Follow these steps to produce a QuickBooks-ready file:
- Create or select a parsing context in xtractor.app that extracts Payee, Date, Amount, Account, Memo, and any order or transaction IDs. See our Email Parser to Google Sheets guide for setup examples.
- Run a filtered bulk import by date range, sender, or subject to limit the dataset to the transactions you need. Use multi-context parsing when emails vary in layout; refer to our multi-context parsing walkthrough for templates.
- Choose XLSX if you need to preserve date formatting or leading zeros, or CSV for downstream automation.
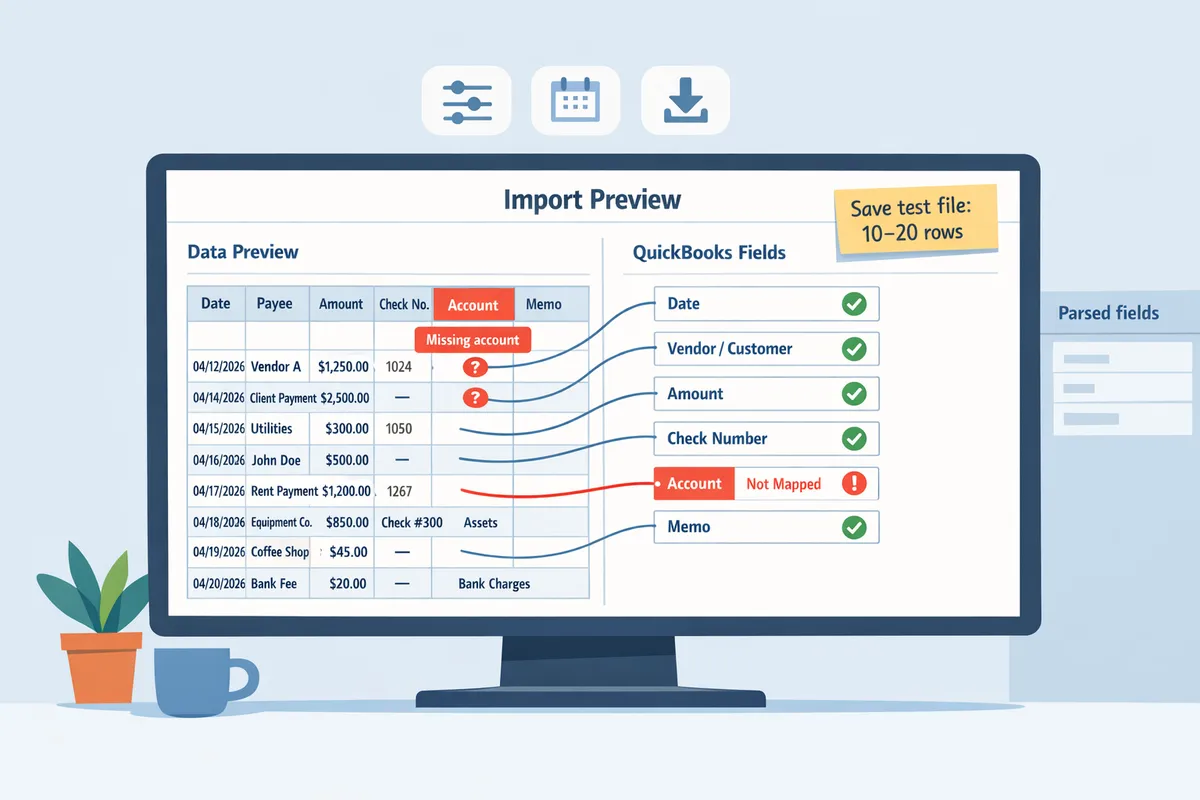
- Open the exported file, normalize vendor names and account labels to match QBO exactly, and save a test file of 10–20 rows for a trial import.
Note: xtractor.app does not parse attachments by default; request a custom parsing plan if your data lives in attached PDFs.
Checklist: permissions, company settings, and accounts to enable imports ✅
Confirm your QBO user has Import permission and enable Location and Class tracking in Company Settings if you will map those fields. Follow this checklist before the first import:
- User permissions. Grant the user the Import role or an Admin role that includes import rights.
- Enable categories. In the New Layout go to Account and Settings > Advanced > Categories to turn on Location and Class tracking if you plan to map them. This step is required to map location and class in quickbooks online import.
- Chart of accounts. Create any missing vendors, expense accounts, or bank accounts in QBO so the imported “Account” values match exactly.
- Currency and fiscal settings. Ensure the spreadsheet currency matches your company settings to avoid rejected rows.
- Duplicate protection. Include a Transaction ID (invoice number, external ID) column so QuickBooks can prevent duplicates on re-imports.
Our guide recommends doing a 10–20 row test import to validate mappings and account matches before processing full batches.
Practical tip before you start 🧪
Always test with a small sample file (10–20 rows) and keep a backup of the original spreadsheet. Run the test import, review QuickBooks’ import preview for unmapped columns or missing accounts, and fix those in your source file before importing the full dataset.
💡 Tip: Save a copy of the original spreadsheet and a separate test file (10–20 rows) before running a full import to avoid mass errors.
For help converting bank statements or PDFs before importing, see our guide on converting bank statement PDFs to QuickBooks and the step-by-step bank statements to QBO conversion article.
How do I set up and run an Excel import for Checks and Expenses in the New Layout?
Follow a focused, repeatable flow: clean your Excel file, use our xtractor.app to produce a matching template, map Location and Class exactly in the New Layout, save a mapping preset, and run a staged test import. This approach reduces manual corrections and stops duplicated or uncategorized transactions before they reach your register.
Step 1: Export and clean data in Excel 🧾
Prepare a clean XLSX with headers that exactly match QuickBooks field names and remove duplicates, blank rows, and inconsistent dates. Use Excel’s Remove Duplicates and TRIM to normalize values, and convert date columns to a single format (for example, YYYY-MM-DD or MM/DD/YYYY) before saving. Example header row we use: Payee, Date, Amount, Memo, Account, Location, Class, CheckNumber, ReferenceNumber. If amounts appear as text, apply a number format and spot-check with a SUM to ensure totals match source documents. Save a master copy and a working copy named with the import date so you can roll back if the import needs correcting.
Step 2: Create a parsing context in xtractor.app and export a template 📤
Create a parsing context in our xtractor.app that extracts payee, date, amount, memo, location, and class and export an XLSX template with those exact headers. In xtractor.app add a new context, define fields (Payee, Date, Amount, Memo, Location, Class), run the context on 10–50 sample emails to confirm field quality, then use the bulk export to Excel option. Exported column headers must match QuickBooks names exactly. If your inbox contains multiple email formats, use multi-context parsing so each layout maps cleanly; see our multi-context parsing guide for real-world templates. Scheduling exports in xtractor.app produces consistent files that align with saved QuickBooks presets, which reduces mapping drift over time.
See our step-by-step email parsing setup for exports to spreadsheets: Email Parser to Google Sheets: Fast Setup, Bulk Imports, and Scheduling (Step‑by‑Step).
Step 3: Map Location and Class fields in the New Layout 📍
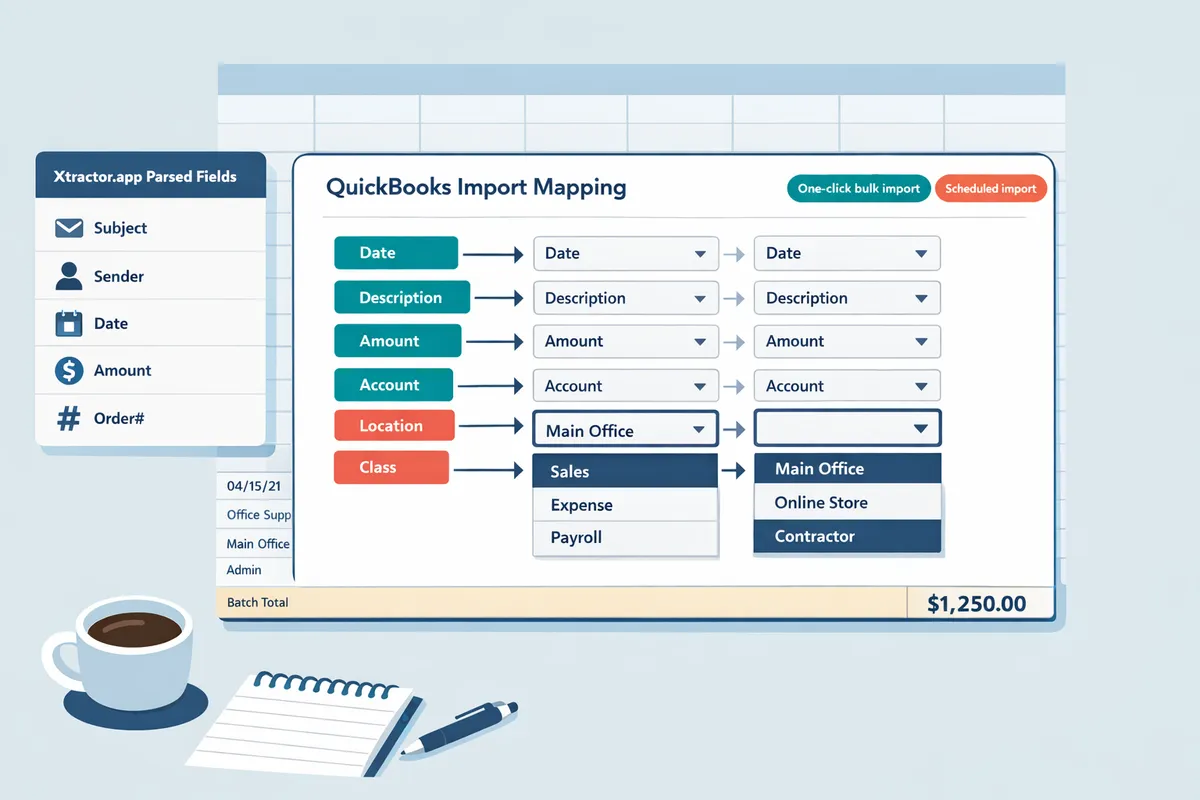
Map the Location and Class columns on QuickBooks’ New Layout mapping screen by selecting the spreadsheet column and then choosing the exact Location and Class names that exist in your company settings. Open the New Layout import flow, upload your XLSX, and at the mapping step select the column that contains Location then pick the matching Location value from the dropdown. If a Location or Class in your sheet does not appear in QuickBooks, create that Location/Class first in Company Settings or correct the source file to match spelling, capitalization, and spacing. Example: if QuickBooks shows “West Coast – Retail” but your spreadsheet has “west coast retail”, QuickBooks will not match it and may assign the default account. Mapping correctly prevents uncategorized expenses and reduces post-import reconciliation time.
💡 Tip: Standardize Location and Class names in QuickBooks and your source file (case and spacing) before saving a mapping preset to avoid mapping errors.
Step 4: Save import mapping presets in QuickBooks for repeat runs 💾
Save a mapping preset in QuickBooks New Layout so the field-to-column assignments apply automatically on future imports and cut manual mapping time. At the mapping screen click Save Mapping, give the preset a descriptive name (for example, ChecksExpenses_v1_2026-07), and include the expected columns in the preset notes. Use versioned preset names when you change file structure. Combine these presets with scheduled xtractor.app exports so each file matches a preset exactly and you can import daily or weekly with minimal review. If your company adds new Location or Class values, update the preset and keep a changelog in your working spreadsheet.
Include the SEO keyword naturally: save import mapping presets quickbooks online by naming presets clearly and updating them when source headers change.
Step 5: Run a staged test import and review results ✅
Run a staged import of 10–20 rows first, review QuickBooks’ import summary, correct any unmapped fields, and then run the full import. Select a representative subset (include different Locations, Classes, accounts, and any checks with voids or negative amounts). After the test import, check the register and run these quick validations: compare total amounts to the source SUM, confirm Location and Class assignments, verify check numbers and memo fields, and search for duplicates using the Audit Log. If errors appear, fix the source spreadsheet, re-export from xtractor.app, and rerun the staged import. For full imports, keep a dated backup of the original XLSX and note the preset used so you can undo or filter imported rows if you need to reverse the batch.
If your workflow includes bank statement conversions or PDF sources, our bank-statement guides explain alternate paths into QuickBooks: Convert Bank Statement PDF to QuickBooks and Convert Bank Statements to QBO.
How do I validate imports, reconcile results, and fix common errors in the New Layout?
Validate imports by matching batch totals to your Excel source, reconciling a handful of representative transactions in the register, and fixing row-level issues shown in QuickBooks’ import error file. Import a small test batch first, use a saved mapping preset for repeatability, and use xtractor.app to deliver clean, normalized spreadsheets so you minimize rework.
Verify totals and sample reconciliation ✅
Match the imported batch totals to your Excel source and reconcile 3–5 representative transactions against the bank register or expense account. Start by exporting the QuickBooks import summary CSV and compare the total and line counts to your source file. If totals differ, filter your Excel sheet (or the xtractor.app export) for blank required fields, duplicate rows, or rows with unexpected signs. Reconcile one payment, one vendor bill, and one refund in the account register to confirm account, tax code, and date mapping. Use the saved mapping preset to re-run the same mapping so field alignment stays identical between test and final runs. For bank-side mismatches see our guide on converting bank statement PDFs into QuickBooks for tips on matching statement lines to imported entries.
Common error messages and quick fixes 🛠️
Most import failures stem from mismatched account or vendor names, incorrect date formats, or missing required fields. QuickBooks will produce an error file that lists the failing rows and a short reason; download that file immediately and cross-reference row IDs to your source. Common fixes:
- Mismatched accounts/vendors. Normalize names in your spreadsheet or pre-create vendor records in QuickBooks. Using xtractor.app, add a normalize step before export to standardize vendor names across email formats.
- Date formats. Convert dates to the company-preferred format (for example, MM/DD/YYYY) and ensure Excel cells are set to “Date” not “Text.”
- Amount and sign issues. Remove thousands separators and put refunds as negative values where QuickBooks expects negatives.
- Missing required fields. Populate required columns (Account, Payee/Vendor, Date, Amount) or map them explicitly in the import preview.
💡 Tip: Save import mapping presets quickbooks online after your test import so fixes and future uploads use the exact same field alignment.
Compare Excel vs CSV for New Layout imports (table) 📊
Excel preserves cell formatting and multi-sheet workflows while CSV supplies a plain-text, delimited file that reduces formula-related import errors. Below is a concise comparison to help you pick the right export from xtractor.app or your spreadsheet.
| Factor | Excel (XLSX) | CSV (UTF-8) |
|---|---|---|
| Preserves cell formatting and formulas | Yes. Can carry formulas and formatting that must be converted to values before import. | No. Exports final values only which reduces surprises. |
| Multi-sheet workflows | Yes. Useful when you maintain related sheets (vendors, classes, transactions) in one file. | No. One sheet per file; simpler for bulk transaction uploads. |
| Common failure modes | Hidden formulas, date formatting, or linked cells that import as text. | Incorrect encoding or comma-in-field issues if not exported properly. |
| File size and performance | Handles larger, complex workbooks but may slow in QuickBooks preview. | Simplier and often faster to parse, but very large CSVs may time out in the browser. |
| When to use | Use when you need multi-sheet templates or preserve manual calculations for review. | Use when you want predictable, value-only rows and fewer format errors. |
Use xtractor.app to choose CSV or Excel output depending on the cleanup steps you apply. For mixed-format email extractions, our multi-context parsing guide shows how to normalize outputs into the right file type before import.
Troubleshooting flow: inspect error file → correct source → re-import 🔁
Follow a strict loop: import a small test batch, download QuickBooks’ error file, fix only the failing rows in your source, and re-import using the saved mapping preset. Step-by-step:
- Run a test import of 20–50 rows and stop at the preview step to confirm field mapping.
- If QuickBooks returns an error file, open it and note the failing row numbers and error messages. QuickBooks lists the cause in the same row so you know what to correct.
- Edit your source spreadsheet (or re-export corrected rows from xtractor.app). Change only the rows that failed. Avoid editing rows that succeeded to reduce duplicate risk.
- Re-import using the same saved mapping preset so mappings do not shift. Select the corrected rows only or upload the corrected file and choose “Import only new rows” where available.
- Reconcile the corrected rows in the register and mark the import as complete once totals and sample reconciliations match.
⚠️ Warning: QuickBooks import ignores attachments in spreadsheet rows. If invoices or receipts must be attached, plan a separate attachments workflow outside the import.
For staged bank imports and troubleshooting of statement lines, see our step-by-step bank statement conversion guide and the QBO conversion workflow for additional reconciliation tactics. For help turning messy email invoices into clean Excel or CSV input files, follow our email parser to Google Sheets guide and multi-context parsing walkthrough on our site.
How do I automate recurring Excel imports and handle advanced mapping and duplicates?
Schedule exports from xtractor.app and apply saved QuickBooks mapping presets so each import uses consistent headers and field alignment. According to xtractor.app, scheduling consistent exports with fixed headers and saved parsing contexts is the fastest path to repeatable imports. This reduces manual field mapping, lowers duplicate risk, and makes staged testing practical before you push transactions to production.
Automate with xtractor.app scheduling and saved parsing contexts ⏱️
Use xtractor.app scheduling and saved parsing contexts to produce Excel files with fixed headers that match QuickBooks mapping presets every time. Set up a parsing context that extracts the exact column names QuickBooks expects (for example: TransactionID, Date, Payee, Account, Amount, Memo, Class, Location). Save that parsing context with a clear name such as CompanyA_Checks_Export. Then schedule exports to run daily or weekly and write the output to a company-specific Google Sheet or an XLSX named with a timestamp. Our guide on Email Parser to Google Sheets: Fast Setup, Bulk Imports, and Scheduling (Step‑by‑Step) shows the step-by-step setup and scheduling options.
Practical naming and file patterns reduce mapping drift. For example, schedule a 02:00 export that always writes CompanyA_Checks_YYYYMMDD.xlsx so your QuickBooks import process uses the same saved mapping preset each run.
Handle duplicates and reuse presets across companies 🔁
Prevent duplicates by including a unique Transaction ID column in exports and by applying company-specific mapping presets in QuickBooks. Create a TransactionID composed of an immutable source identifier such as order number or a concatenation like VendorCode|Date|Amount so each row is unique at the source. Map that column to the external transaction ID or memo field in QuickBooks when you create and save the import mapping preset. Save import mapping presets quickbooks online with a company prefix (for example, CompanyA_Checks_Map) so you never apply a CompanyB preset to CompanyA imports.
Also route scheduled exports into separate folders or Google Sheets for each company to avoid cross-company file mixups. If QuickBooks flags duplicates during import, use the import error file to locate conflicting rows and trace them back to the TransactionID exported by xtractor.app.
Advanced mapping techniques: split lines and multi-line expenses 🔀
Map split expenses by exporting one row per split line that shares the same Transaction ID so QuickBooks groups lines under a single check or expense during import. Format each split row with identical TransactionID and CheckNumber values and different Account and Amount fields. For example, a single vendor payment allocated to Office Supplies, Meals, and Freight becomes three rows with the same TransactionID and differing Account and Amount columns.
Make sure your saved QuickBooks mapping preset maps TransactionID to the field QuickBooks uses for grouping and that you map location and class in quickbooks online import exactly to QuickBooks’ internal names. Inconsistent Class or Location labels create uncategorized lines. Test a 5-row split-case in a sandbox company to confirm grouping before running a full scheduled import.
Custom parsing and higher-volume plans
Request xtractor.app custom parsing for attachments or nonstandard email formats, and use bulk-export plans for thousands of rows while testing imports on a mirrored sandbox company. If source emails include PDFs or attachment layouts that our default parser does not handle, our custom parsing options let us extract specific fields from attachments and place them into the same fixed-header Excel you use for imports. For bank-statement style inputs, see our walkthroughs for converting PDFs and bank statements to QuickBooks formats at Convert Bank Statement PDF to QuickBooks and Convert Bank Statements to QBO.
When you expect thousands of rows per run, provision bulk export capacity and run the scheduled output into a sandbox QuickBooks company. Run a sample import of 1,000 rows first and reconcile totals against the source file to spot mapping shifts. For mixed-format inboxes, add multiple parsing contexts as described in Multi-Context Parsing to Handle Varying Email Layouts: Step-by-Step Setup with Real-World Templates.
💡 Tip: Schedule a nightly test run into a sandbox company or a tagged bank account to verify mapping changes before pushing to production.
Frequently Asked Questions
This FAQ answers common, transactional questions about importing Checks and Expenses from Excel into the QuickBooks Online New Layout and how xtractor.app supports that workflow. Each answer gives the precise step or setting you need to finish an import, validate results, and avoid common pitfalls.
How do I map Location and Class in QuickBooks Online import? 📁
Map Location and Class by matching the spreadsheet column to the Location or Class field on the New Layout mapping screen and ensuring the names match exactly with entries in Company Settings. QuickBooks requires exact name matches; if your spreadsheet has “NY Office” but Company Settings shows “New York Office” the import will create errors or unmatched lines. Best practice: export current Location and Class lists from QuickBooks, paste them into a lookup sheet, then use that sheet to normalize values before importing. xtractor.app can output a clean Excel file with a dedicated Location and Class column so the mapping step only requires selecting the corresponding column in the New Layout.
⚠️ Warning: Mismatched names for Location or Class cause import rows to fail rather than silently map to a default.
Can I import Checks and Expenses from Excel to the New Layout? ✅
Yes. Export a clean XLSX or CSV with QuickBooks-required headers, map fields on the New Layout import screen, run a small test batch, then import the full file after validation. Required headers depend on the transaction type; for Checks and Expenses include date, payee, account, amount, and a Transaction ID when possible. Use our xtractor.app to parse emails into a ready-to-import Excel that uses those headers. Start with a 10-row test import to confirm field mapping and totals before committing larger batches.
How do I save import mapping presets in QuickBooks Online? 💾
Save a mapping preset by completing the mapping step during an import session and selecting the New Layout’s save preset option before finishing the import. Once saved, the preset appears in the import dialog for future uploads and preserves column-to-field alignment, including class and location mappings. If you use xtractor.app to produce exports, name and freeze the exported column headers to match that preset so imports become a two-click process.
Which is better for imports: Excel or CSV? 🔢
Choose XLSX when you need to preserve formatting, multiple sheets, or formula-driven lookups; choose CSV for straightforward, delimiter-based uploads that often avoid Excel-specific formatting errors. QuickBooks handles both formats but common problems differ: XLSX errors usually come from hidden formatting or dates stored as text, while CSV errors usually stem from delimiter or encoding mismatches. Our recommendation: use xtractor.app to export XLSX when you maintain lookup sheets or formulas, and export CSV when you are sending flat, pre-cleaned transaction lists for batch imports.
How do I prevent duplicate transactions when importing? 🔎
Prevent duplicates by including a unique Transaction ID column in your export, testing small batches, and enabling QuickBooks’ duplicate-detection features where available. Practical steps:
- Add a stable unique ID in your source system or create one in xtractor.app (for example, invoice number + date).
- Run a 10-row test import and confirm QuickBooks flags duplicates or rejects them as expected.
- If you import recurring exports, save and reuse a mapping preset and keep the Transaction ID column immutable.
xtractor.app can add or preserve a Transaction ID during parsing so your import file already contains the duplicate protection field.
💡 Tip: Always run test imports and compare batch totals in QuickBooks to your source file before processing full files.
Can xtractor.app export directly into QuickBooks? 🔄
xtractor.app does not push transactions directly into QuickBooks by default; it exports parsed data to Excel, CSV, or Google Sheets for import into QuickBooks. For direct integrations, attachments parsing, or custom workflows, our team offers custom plans that can add a direct push or intermediary automation. Use xtractor.app’s scheduling and saved parsing contexts to create consistent, import-ready files and then use QuickBooks mapping presets to minimize manual work. For an automated spreadsheet pipeline, see our guide on Email Parser to Google Sheets: Fast Setup, Bulk Imports, and Scheduling (Step‑by‑Step).
Related resources: if you need bank-statement-specific workflows, see our walkthroughs on converting bank statement PDFs into QuickBooks at Convert Bank Statement PDF to QuickBooks and converting statements to QBO at Convert Bank Statements to QBO.
Next steps to finish importing Checks and Expenses into QuickBooks Online New Layout.
The fastest way to reduce manual entry is to confirm field mappings, save a preset, validate a small batch, and run the full import. QuickBooks Online New Layout import Excel will succeed when your account, class, and location columns map consistently and you test 10–20 transactions first. See our email-to-Google Sheets workflow for examples of mapping, validation, and scheduling.
Xtractor.app is an email parsing and data-extraction tool that pulls structured text out of emails and exports it directly into Google Sheets, CSV, or Excel. The product is designed to import thousands of emails in a single action or on a scheduled cadence, parse relevant fields (subject, sender, date, amounts, order numbers, etc.), and produce a clean, tabular output in a spreadsheet for reporting, analysis, or bookkeeping. Key features include one-click bulk import, custom filters, multiple parsing contexts, saved searches/filters for reuse, and scheduling to automate daily imports.
💡 Tip: Validate a saved preset on 20 rows before bulk import to catch mapping or class/location mismatches early.
Start a free trial of xtractor.app and run a test import using our email-to-Google Sheets setup to create and save import mapping presets. For bank-statement workflows, review our guide on converting bank statement PDFs into QuickBooks to align formats before import.