Small bookkeepers spend up to 8 hours each week cleaning CSV and Excel exports before a QuickBooks CSV import, which increases transcription errors and slows month-end close. QuickBooks CSV import is a spreadsheet import process that maps CSV or Excel columns to QuickBooks Online or Desktop fields to add invoices, expenses, and bank transactions. Xtractor.app is an email parsing and data-extraction tool on our site that pulls structured text from thousands of emails into Google Sheets, CSV, or Excel and produces clean, tabular output ready for mapping. This best-practices guide teaches small business bookkeepers and controllers how to prepare, import, validate, and reconcile data across QuickBooks Online and Desktop—and reveals the single mapping misstep that most often creates duplicate transactions.
How do QuickBooks Online and Desktop differ for CSV imports?
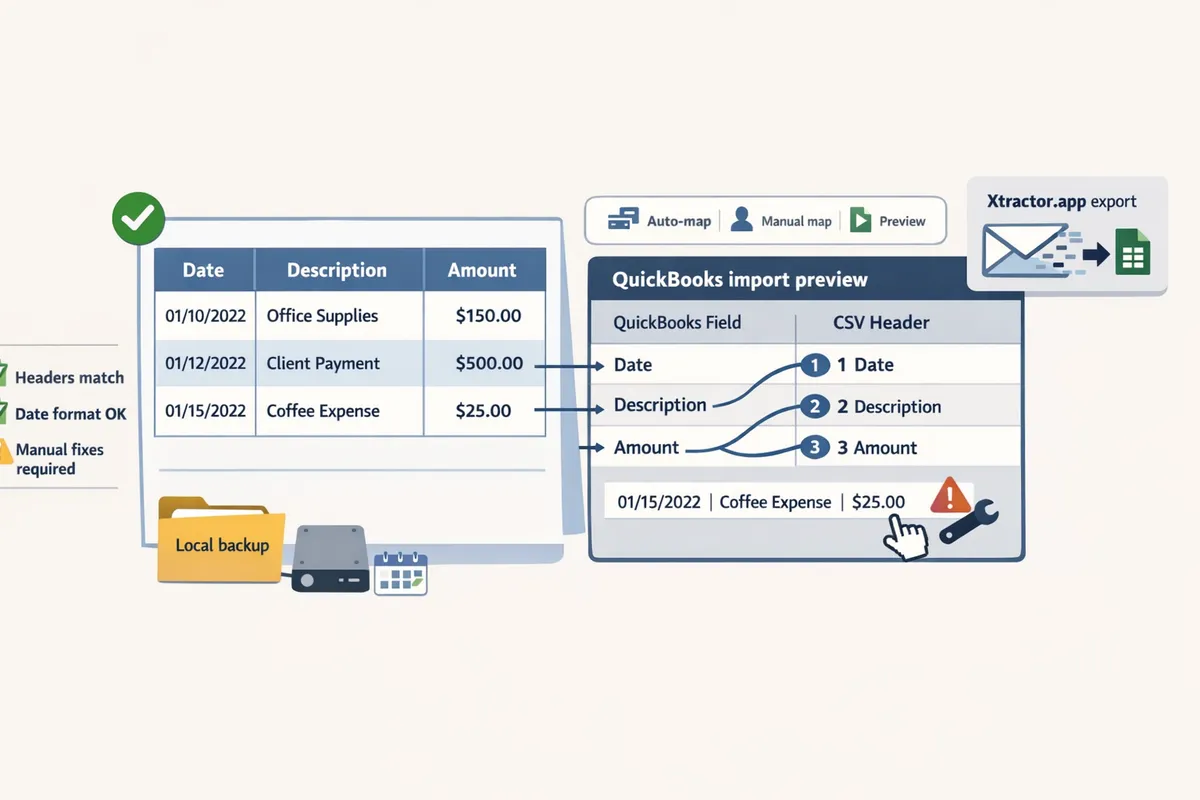
QuickBooks Online uses an in-UI Import Transactions flow while QuickBooks Desktop relies on the Import Excel and CSV Toolkit or Web Connect. This matters because Online enforces stricter header and date formats in the browser UI, while Desktop gives a guided mapping tool but requires a local backup strategy and occasional manual fixes. Choosing the right path affects time spent cleaning files, error rates at import, and how repeatable the process becomes for a small accounting team.
What file formats and field mappings does QuickBooks accept? 📄
QuickBooks accepts CSV and Excel files with exact header names and specific date and amount formats. QuickBooks expects headers like Date, Description, Amount, Account, Class, and Customer:Job and will reject or mis-map rows when headers differ. For dates use the format your company file expects (for U.S. files use MM/DD/YYYY; for other regions confirm DD/MM/YYYY) and avoid localized separators (use a dot for decimals if your QuickBooks uses dots). Amounts should be positive or negative in one column; Desktop toolkit accepts separate Debit and Credit columns for journal entries. A common pitfall is mismatched account names: if your CSV has “Office Supplies” but the company chart uses “Office Expense,” QuickBooks will create an uncategorized or duplicate account. xtractor.app can export cleaned CSVs from email sources and normalize date formats and header names before you import, which reduces rework.
Which CSV formats are common (3-column vs 4-column)? 🔢
Three-column CSVs (Date, Description, Amount) fit simple bank and credit card imports while four-column or expanded layouts add Account or Debit/Credit for bills and general ledger entries. Use a 3-column layout for bank statement rows you plan to match in Bank Reconciliation. Use a 4-column layout (Date, Description, Account, Amount) for vendor bills or expenses that need immediate account mapping. Use separate Debit and Credit columns for journal entries that post to multiple GL accounts. For example, import a credit card feed as Date / Description / Amount and map it to the Credit Card account during import; import vendor bills as Date / Vendor / Account / Amount to preserve payables. Mistaking a 3-column feed for a GL import often creates uncategorized transactions and slows reconciliation. xtractor.app can produce either layout on export, letting you match the import csv into quickbooks online or the Desktop toolkit format precisely. See our walkthrough on converting PDF bank statements to CSV for common layout examples and step sequences.
How does the QuickBooks Desktop Import Excel and CSV Toolkit work? 🧰
QuickBooks Desktop Import Excel and CSV Toolkit is a desktop utility that guides field mapping, validates sample rows, and converts spreadsheets into QuickBooks transactions. The toolkit prompts you to map each spreadsheet column to a QuickBooks field and shows validation errors before the import runs. Follow this checklist: install the toolkit, back up the company file, map fields, validate a small sample of rows, then run the full import. ⚠️ Warning: Always back up your company file before importing with the QuickBooks Desktop toolkit and validate sample rows to avoid irreversible mapping mistakes. The toolkit reduces manual typing but still requires consistent header names and chart-of-account matches; using xtractor.app to pre-clean and standardize CSV exports from emails or PDFs cuts the number of failed rows and post-import corrections.
Comparison table: import methods (QuickBooks Online, Desktop toolkit, third‑party, xtractor.app) 📊
The best import method depends on data source, volume, and need for repeatable automation. Below is a concise comparison to help decide which path fits your team’s workload.
| Method | Supported sources | Setup time | Error handling | Automation capability | Best use case |
|---|---|---|---|---|---|
| QuickBooks Online in-UI | CSV, Excel exports from banks/vendors | Low for one-off imports | Browser shows row errors; manual remap | Limited scheduled imports | Small batches and ad-hoc uploads; import csv into quickbooks online for occasional statements |
| QuickBooks Desktop toolkit | CSV, Excel, Web Connect (QBO) | Medium (toolkit install, backup) | Guided mapping with preview; local backup required | Low; manual process each run | One-time bulk imports into desktop company files; use quickbooks desktop import excel and csv toolkit |
| Third-party ETL (e.g., Skyvia) | Banks, CRMs, apps, CSVs | Medium-high (connector setup) | Usually robust logging and retries | High; scheduled syncs and transformations | Ongoing syncs between apps and QuickBooks |
| xtractor.app | Email bodies to CSV/Sheets, filtered exports | Low (one-click bulk parse) | Produces cleaned CSVs; reduces transcription errors | High; saved filters and scheduling for inbox parsing | Extracting invoices, receipts, and bank emails at scale before import |
xtractor.app works well when source data lives in email: it extracts order numbers, amounts, dates, and descriptions into a QuickBooks-ready CSV or Google Sheet and can run on a schedule to avoid weekly manual exports. If you handle many emailed receipts or bank alerts, pairing xtractor.app with QuickBooks Online import csv workflows or the Desktop toolkit saves hours and reduces reconciliation errors. For step-by-step PDF-to-CSV and QBO guidance, see Convert PDF Bank Statements to CSVXtractor and Convert Bank Statement PDF to QuickBooksXtractor. You can also read how to export email data to CSV for bookkeeping workflows in our export guide.
What are proven preparation strategies and templates that reduce import errors?
Standardized, entity-specific CSV templates plus a field-mapping cheat sheet and a pre-import validation checklist reduce QuickBooks CSV import errors. These items cut manual clean-up time, lower duplicate records, and make reconciliation predictable.
How to build CSV templates for bank transactions, customers, vendors, and chart of accounts 🗂️
Use separate, entity-specific CSV templates with required headers, example rows, and clear mandatory versus optional columns. Our website provides downloadable examples you can drop into Google Sheets or Excel and use for both QuickBooks Online and Desktop.
Bank transactions (sample headers).
- Required: Date, Description, Amount, Transaction Type (Debit/Credit), Bank Account Name.
- Optional: Check Number, Reference, Category.
- Example row: 2026-06-10, “ACME Supplies”, -45.00, Debit, “Bank of Main Checking”.
Customers (sample headers).
- Required: Display Name, Email, Billing Address, Customer Type.
- Optional: Phone, Terms, Tax Exempt.
- Example row: “Smith Co.”, “accting@smithco.com“, “123 Main St, Anytown”, “Wholesale”.
Vendors (sample headers).
- Required: Display Name, Email, Vendor Type, Default Expense Account.
- Optional: Phone, Tax ID.
- Example row: “Office Supplies LLC”, “billing@officesup.com“, “Supplier”, “Office Supplies Expense”.
Chart of accounts (sample headers).
- Required: Account Name, Account Type, Detail Type, Account Number (if used).
- Optional: Description, Subaccount Of.
- Example row: “1010 – Checking”, “Bank”, “Checking”, “1010”.
For bank-statement-first workflows, follow our guide on converting PDF statements to CSV before mapping: Convert PDF Bank Statements to CSVXtractor and see Convert Bank Statement PDF to QuickBooksXtractor for the QBO path. xtractor.app can export parsed email and statement data directly into these templates to avoid manual typing.
What should a field-mapping cheat sheet include? 🧾
A field-mapping cheat sheet should list the QuickBooks field name, acceptable values, expected formats, and common name conversions for each transaction type. Include one-line mapping examples so your bookkeeper can map headers in the QuickBooks import UI without guessing.
| Transaction type | CSV column | QuickBooks field | Example value | Notes |
|---|---|---|---|---|
| Bank transaction | Date | Transaction Date | 2026-06-10 | Use YYYY-MM-DD for QBO browser imports |
| Bank transaction | Amount | Amount | -45.00 | Negative for withdrawals, positive for deposits |
| Invoice | Customer | Customer Ref | “Smith Co.” | Must match existing customer name or create during import |
| Invoice | Item | Line Item | “Service Hourly” | Map to an active sales item in Chart of Accounts |
| Bill | Vendor | Vendor Ref | “Office Supplies LLC” | Vendor must exist or import vendor list first |
| Journal entry | Account | Account Name | “Sales Revenue” | Use exact chart of accounts name; include parent accounts if hierarchical |
Map common name conversions explicitly. Example: convert “Bank of Main” into “Bank of Main Checking” in your CSV to match QuickBooks account names. For browser-based imports, follow the stricter header and date rules used to import csv into quickbooks online and compare with Desktop toolkit requirements in our Desktop guidance.
What validation checklist prevents duplicates and mapping errors? ✅
A pre-import validation checklist confirms header accuracy, correct date and amount formats, account existence, and duplicate detection before you run a bulk import. Follow these steps every time to avoid rollback work and reconciliation headaches.
- Validate headers exactly match your template and QuickBooks field names.
- Confirm date format. Use YYYY-MM-DD for QuickBooks Online browser imports.
- Check amounts for sign conventions (negative for payments/withdrawals).
- Verify every referenced customer, vendor, and account exists in QuickBooks or include a separate import for them first.
- Run duplicate detection: sort by reference and date to flag repeated invoice or check numbers.
- Run a 10-row sample import into a spare company file or a month with low activity.
- Reconcile sample import totals to source bank totals and check for unmatched customers or accounts.
- After bulk import, reconcile a random week of transactions before finalizing the period.
💡 Tip: Always run the 10-row sample import before full import and keep a rollback plan (export a backup or use a test company) if you use QuickBooks Desktop.
Our guidance on converting bank PDFs and reconciling after import provides step-by-step checks: Convert Bank Statement PDF to QuickBooksXtractor.
When should you use xtractor.app to prepare CSVs from email instead of manual copy-paste? ✉️
Use xtractor.app when you must extract structured fields from hundreds or thousands of emails or when the task repeats regularly. xtractor.app bulk-parses inboxes on demand or on a schedule and exports clean CSV or Google Sheets ready for QuickBooks import.
Typical scenarios where xtractor.app saves time.
- Daily sales receipts emailed from a point-of-sale platform where you need date, amount, and order number in a sheet.
- Vendor bills that arrive by email in several formats but share consistent fields like invoice number and total.
- Bank alerts and CSV attachments summarized across accounts where manual find-and-copy would take hours.
xtractor.app features that matter.
- One-click bulk import of messages and scheduled parsing to keep spreadsheets current.
- Multiple parsing contexts to handle format variations across vendors and emails.
- Direct export to CSV or Google Sheets so you can drop parsed data into the templates above and import csv into quickbooks online without rekeying.
When not to use xtractor.app: single, one-off emails are faster to copy manually. For workflows that start with bank PDFs attached to emails, see our Convert Bank Statement PDF to QuickBooksXtractor and Convert Bank Statements to QBOXtractor articles for recommended flows and mappings.
How do you execute imports, troubleshoot failures, and verify results?
Execute imports by following the platform-specific flow, applying targeted fixes for common failures, and running a short reconciliation checklist to confirm results. This reduces duplicate records, speeds month-end close, and limits time spent on manual corrections.
Step-by-step: how to import CSV into QuickBooks Online 🚀
Import csv into Quickbooks Online by selecting the file type, uploading the CSV, mapping columns, previewing a sample, and importing only after the sample looks correct. xtractor.app is an email parsing and data-extraction tool that pulls structured text out of emails and exports it to Google Sheets or clean CSV, which reduces mapping errors before you upload. Follow these steps.
- Prepare: Ensure headers match QuickBooks Online field names and dates use YYYY-MM-DD or MM/DD/YYYY per your company settings.
- Upload: Go to Gear > Import Data > Transactions and choose the transaction type.
- Map: Map CSV columns to QuickBooks fields. Save a mapping preset for repeated imports.
- Preview: Run a sample import of 5–20 rows and verify account, tax, and customer matches.
- Import: Import the full file and immediately reconcile the sample transactions.
Use xtractor.app to extract email receipts or daily reports into a consistent CSV that matches your mapping preset. See our Convert PDF Bank Statements to CSVXtractor guide for hybrid bank-statement workflows.
Step-by-step: how to use the QuickBooks Desktop Import Excel and CSV Toolkit 🛠️
QuickBooks Desktop import Excel and CSV toolkit requires mapping headers in the toolkit, exporting the converted IIF or QBX file, and testing in a copy of the company file before final import. Follow this safe sequence.
- Backup: Create a full company-file backup before any import.
- Map: Open the QuickBooks Desktop Import Excel and CSV Toolkit and match CSV headers to QuickBooks fields. Save the mapping as a preset.
- Preview: Use the toolkit preview to convert and inspect the resulting file for missing fields and date formats.
- Test import: Import into a test company file and run reports (trial balance, vendor summary).
- Full import: When the test file checks out, import into production and immediately reconcile key accounts.
⚠️ Warning: Always keep a recent backup and test imports on a copy of the company file to avoid costly rollbacks.
xtractor.app can pre-clean spreadsheets so the toolkit mapping step requires fewer manual corrections. For bank statements handled as PDFs, see Convert Bank Statement PDF to QuickBooksXtractor.
How to troubleshoot common import errors and fixes 🔍
Most import failures stem from five issues: mismatched account names, invalid date formats, duplicate transactions, bad headers, and currency/negative-amount formats. Below are targeted fixes and when to reformat data versus edit QuickBooks.
- Mismatched account names. Fix: standardize account names in the CSV to match QuickBooks exactly or create the missing account in QuickBooks first. Reformat when many names differ; edit QuickBooks when only a few are missing.
- Invalid dates. Fix: normalize dates in the CSV to the company’s accepted format. Use xtractor.app to parse and standardize dates from email sources before import.
- Duplicate transactions. Fix: enable duplicate protection in the import flow and remove duplicate rows in the CSV. Reformat when source exports repeat lines.
- Bad headers. Fix: rename CSV headers to QuickBooks field names or use a mapping preset. Reformat once and save the preset for future imports.
- Currency and sign errors. Fix: ensure negative amounts use a minus sign, not parentheses, or use separate debit/credit columns per QuickBooks requirements.
💡 Tip: Keep a short log of the exact error text and the CSV row number; matching those speeds root-cause fixes.
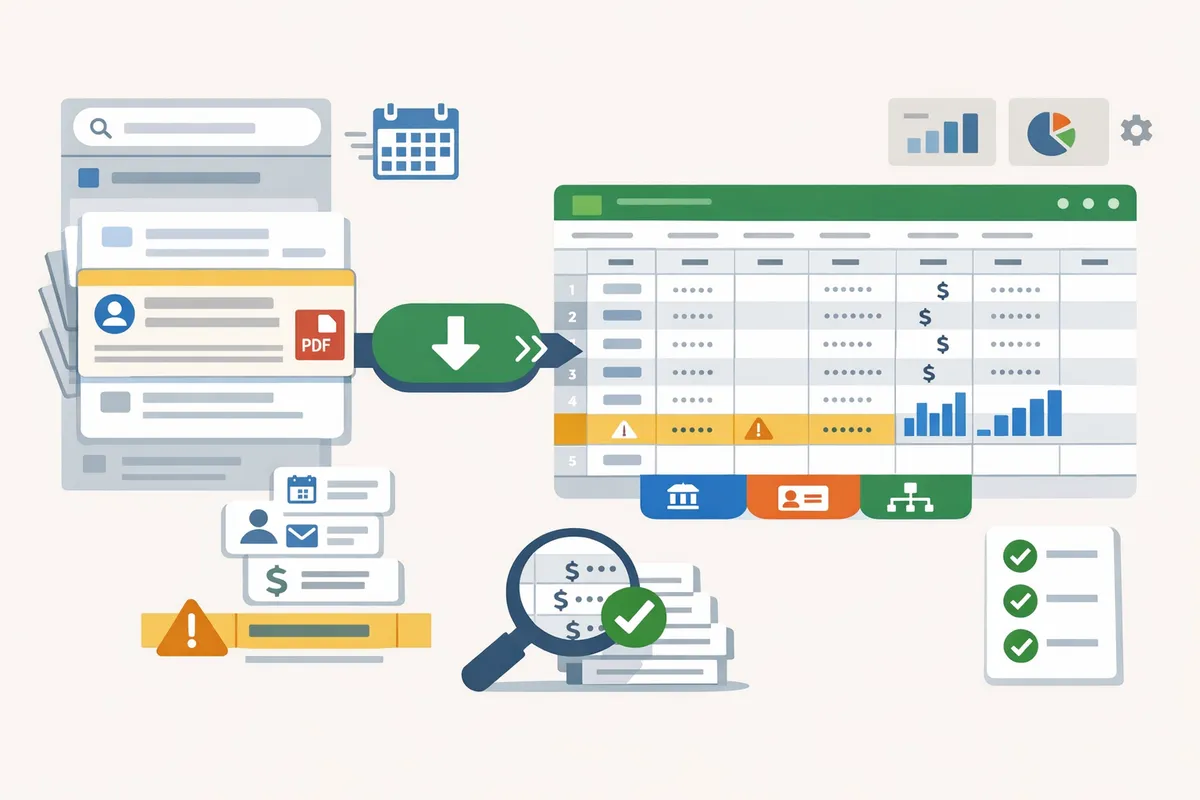
What post-import reconciliation steps confirm data integrity 🔁
Post-import checks confirm totals, remove orphaned items, and verify that sample transactions behave identically to their source documents. Run these steps immediately after import and on a weekly cadence for high-volume feeds.
Immediate checklist after any import:
- Match import totals to the original CSV and source bank statement for the import date range.
- Run a trial balance and compare key account subtotals against prior-period balances.
- Sample 10–20 invoices or payments: open each transaction and compare customer, date, amounts, and account assignment.
- Search for orphaned transactions: deposits or payments without linked accounts or customers.
- Check for duplicates using the created/modified timestamp and transaction numbers.
Weekly checks for high-volume imports:
- Run a bank reconciliation for any imported bank lines.
- Review receivables and payables aging reports for unexpected changes.
- Validate mapping presets remain accurate after source layout changes.
xtractor.app can run scheduled extracts to produce the CSVs that feed these checks, reducing manual rework. For steps converting PDFs to CSV before import, see Convert Bank Statements to QBOXtractor and Convert PDF Bank Statement to QuickBooksXtractor.
When to choose xtractor.app or a third‑party automation tool over manual imports ⚖️
Choose xtractor.app when source data lives in email, volume exceeds hourly manual processing, or you need scheduled, repeatable CSV outputs that match your QuickBooks mapping presets. Small teams that manually extract hundreds of email receipts per month typically spend dozens of hours on formatting and suffer more reconciliation errors. Using xtractor.app removes repetitive copy/paste work and produces consistent CSVs you can import directly.
Business scenarios that favor automation:
- Daily sales summary emails that need to flow into QuickBooks without manual intervention.
- High-volume receipt processing where a single parser can save 10+ hours weekly.
- Mixed-format supplier emails where multiple parsing contexts reduce manual rework.
If source files are PDFs, consider a hybrid workflow: convert bank statements to CSV first and then import. See Convert PDF Bank Statements to CSVXtractor and Convert Bank Statement PDF to QuickBooksXtractor. For extracting Gmail or exported email data, our guides Simplify Your Data Management: How to Export Email Data to CSVXtractor and How to Export Gmail Emails to CSV: A Comprehensive GuideXtractor show practical export options.
Frequently Asked Questions
This FAQ answers the operational questions bookkeepers and controllers ask when preparing and validating QuickBooks CSV imports. Use these answers to reduce duplicates, fix format mismatches, validate safely, and decide when to use the QuickBooks toolkit versus automation tools.
How do I import CSV into QuickBooks Online without creating duplicates? 🔁
Prevent duplicates by giving each transaction a unique identifier and running a small sample import to confirm QuickBooks Online’s duplicate-detection behavior. QuickBooks Online commonly flags duplicates by matching date, amount, and bank reference; adding a TransactionID column forces a clear primary key for your spreadsheet.
- Add a TransactionID (for example INV-2024-0001 or TXN-20240601-01) to every row.
- Remove obvious duplicates in the sheet by sorting on TransactionID, date, and amount.
- Import a 10–20 row sample into a test company and confirm QuickBooks does not create duplicates.
- Import the full file once the sample matches.
xtractor.app can add consistent IDs and export clean CSVs from parsed email data, which reduces manual tagging errors. See our guide on exporting email data to CSV for workflows that keep identifiers intact: Simplify Your Data Management: How to Export Email Data to CSVXtractor.
💡 Tip: If your source system lacks unique IDs, create them with a spreadsheet formula combining date, vendor, and a running counter; this prevents most duplicate imports.
Can I use the QuickBooks Desktop Import Excel and CSV Toolkit for bank statements? 🏦
Yes. The toolkit accepts bank-style CSVs, but bank statements usually require column normalization or conversion to Web Connect/QBO for reliable reconciliation. Banks export many formats (two-column, four-column, PDF tables), and QuickBooks Desktop expects consistent column names and date/amount formats.
- Normalize columns (Date, Description, Amount, Debit/Credit or Signed Amount) before using the toolkit.
- For easier reconciliation, convert downloaded statements to QBO when your bank format is nonstandard.
- If you start from PDFs, use a conversion workflow to produce bank-style CSV or QBO files.
For step-by-step workflows to convert bank statement PDFs and prepare QBO files, see: Convert Bank Statement PDF to QuickBooksXtractor and Convert Bank Statements to QBOXtractor. Our website can assist with conversion and normalization when PDFs or unusual CSV layouts create mismatches.
What date and number formats does QuickBooks accept? 📅
QuickBooks accepts MM/DD/YYYY or YYYY-MM-DD date formats and numeric amounts that use a period as the decimal separator; you must normalize regional formats in your CSV before importing. For example, use 12/31/2024 or 2024-12-31 for dates and 1234.56 for amounts rather than 1.234,56.
- Convert European-style dates and commas-as-decimals in the spreadsheet before saving CSV.
- Ensure negative values appear either as -123.45 or in separate Debit/Credit columns depending on the import template.
If you extract data with xtractor.app, configure the output format to standardize dates and decimals automatically so QuickBooks mapping fails less often. For PDF-to-CSV conversions and format examples, see: Convert PDF Bank Statements to CSVXtractor.
How can I validate an import before committing to the company file? ✅
Validate imports by importing a 10–20 row sample into a test company file or a backup copy and reconciling totals against the original source file. This confirms account mappings, customer/vendor assignments, and that no rows are rejected before touching production data.
- Make a company-file backup or use a sandbox/test company.
- Import a representative 10–20 row sample with the same mapping you plan to use.
- Reconcile the imported totals to the source CSV and confirm account and customer mappings.
- Search the test file for duplicates and mismatched accounts.
⚠️ Warning: Always back up the company file before a bulk import. Restoring from a backup is faster and safer than attempting manual corrective edits after bad imports.
xtractor.app supports scheduled exports and test runs to a Google Sheet so you can validate parsed data before saving CSV for QuickBooks import. See our export guide for recommended validation fields: How to Export Gmail Emails to CSV: A Comprehensive GuideXtractor.
Does xtractor.app handle attachments and PDFs from email for QuickBooks imports? 📎
xtractor.app parses structured text in emails into CSV and Google Sheets by default, and attachments or PDFs require a custom parsing plan that our team can implement. Attachments often contain tables or images that need bespoke rules to extract invoice lines, order numbers, or bank tables reliably.
- We offer custom parsing to extract data from PDF bank statements, invoice attachments, and varied email formats into a unified CSV ready for QuickBooks.
- For high-volume or scheduled workflows, xtractor.app can run daily parses and deliver validated CSV or Google Sheets that match QuickBooks import templates.
For self-service steps and when to request a custom plan, see our PDF bank-statement conversion guides: Convert PDF Bank Statements to CSVXtractor and Convert Bank Statement PDF to QuickBooksXtractor.
What should I do if QuickBooks rejects my CSV file? 🛑
Isolate the failing rows with a small sample import, then check headers, date and number formats, empty required fields, account names, and file encoding. QuickBooks error messages usually indicate the problematic row or field type, which makes targeted fixes faster.
- Import 5–10 rows to trigger the same error and capture the exact message.
- Verify header names match the platform’s expected columns and that required fields are not blank.
- Confirm dates and decimals follow QuickBooks formats and that referenced accounts exist in the company file.
- Save the CSV in UTF-8 and retry the sample import.
If bank-statement rows repeatedly fail, convert the CSV to QBO or normalize columns first; see Convert Bank Statements to QBOXtractor for conversion options. xtractor.app can pre-validate and normalize files to reduce rejected rows.
Final steps for completing a QuickBooks CSV import.
A QuickBooks CSV import succeeds when source files are clean, fields match QuickBooks templates, and you run a sample reconciliation before bulk loading. Clean, validated CSVs cut import errors and save bookkeeping hours. Xtractor.app is an email parsing and data-extraction tool that pulls structured text out of emails and exports it directly into Google Sheets, CSV, or Excel.
Start by parsing a small batch and exporting a test CSV, then confirm column headers and a handful of transactions. If you plan to import csv into quickbooks online, follow our Convert Bank Statements to QBO guide for mapping and currency checks. For PDF-to-CSV workflows, see our Convert PDF Bank Statements to CSV walkthrough, and for email-specific exports try Simplify Your Data Management: How to Export Email Data to CSV.
💡 Tip: Test with 10–20 rows and reconcile a few transactions before you import at scale.
Create your first parser on Xtractor.app using the Convert Bank Statement PDF to QuickBooks guide and export a clean CSV to run your import. Subscribe to our newsletter for ongoing QuickBooks CSV import tips and mapping templates.