A single failed CSV import can cost a bookkeeping team four hours of reconciliation. QuickBooks Online CSV import troubleshooting is a process that identifies and fixes formatting, header, mapping, and validation errors that cause imports to fail. This article provides downloadable CSV templates, a free preflight validator for Google Sheets and Excel, and step-by-step fixes so bookkeepers avoid failed imports and speed reconciliation. xtractor.app is an email parsing and data-extraction tool that pulls structured text from emails and exports it into Google Sheets, CSV, or Excel, producing clean tables. With our Email to Sheets Automation guidance, xtractor.app handles bulk imports, custom parsing contexts, and scheduling to produce files that match QuickBooks requirements. Which three small formatting mistakes cause the majority of silent rejections?
How does the preflight CSV template and validator prevent QuickBooks Online import errors?
The preflight template standardizes headers, data types, and column order to prevent mapping and format failures.
The preflight validator checks headers, date and number formats, column counts, and row limits before you upload. Running the validator before import catches the errors QuickBooks reports most often so you do not waste time on failed uploads or manual fixes.
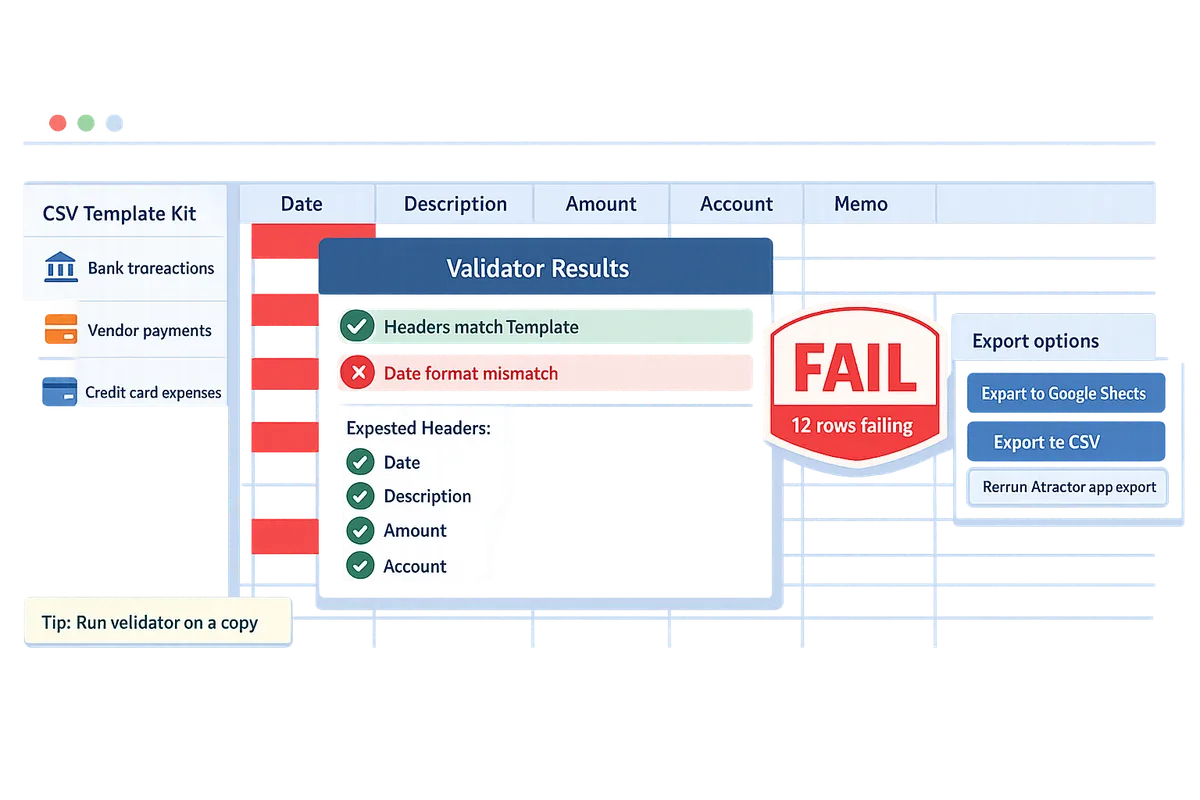
What is the preflight validator? 🧰
The preflight validator is a spreadsheet tool that checks headers, data formats, column counts, and file encoding and then outputs a pass/fail score. It runs these checks: header match versus QuickBooks header names, date pattern validation (a common cause of “invalid date format quickbooks online csv”), numeric precision and currency formatting, duplicate transaction detection, CSV encoding and delimiter checks, and row/column limits. The validator produces a color-coded report and a single pass/fail score so you know whether to import, fix, or re-export.
The validator supports Google Sheets and Excel and includes a README tab with exact QuickBooks Online header names and the preferred date and number examples (for example: 2023-08-15 and 12345.67). Use the validator output to highlight the exact row numbers and cells that fail each check so you can fix the data in place or re-run an Xtractor.app export into the correct template.
Tip: Always run the validator on a copy of your spreadsheet. The report marks failing rows so you can revert to the original raw data if needed.
CSV template kit for QuickBooks imports 🗂️
The CSV template kit is a set of ready-to-use templates (bank transactions, vendor payments, checks, credit card expenses) with example rows and required/optional column notes. Each template contains a header row that maps directly to QuickBooks Online field names and a sample block of 3–5 filled rows that show correct date formats, debit/credit conventions, memo text length, and currency precision.
Included files: bank-transactions.csv, vendor-payments.csv, checks.csv, cc-expenses.csv, plus a mapping cheat sheet that lists “Template Header → QuickBooks Online Field” for every column. Required columns are marked and must match exactly; optional columns show acceptable values and when QuickBooks ignores them. The kit includes a sample bank transaction row: Date: 2023-08-15, Description: “ACME Supplies”, Amount: 124.50, Type: Debit, Account: Bank Checking. Use those sample rows as copy-paste examples to test the validator quickly.
Xtractor.app can export parsed email data directly into these templates so you avoid manual reformatting. See the guide on how to set up an email parser and export to Google Sheets for bulk imports in our Email Parser to Google Sheets walkthrough. If you convert bank statements first, follow the Convert Bank Statement PDF to QuickBooks guide to align the exported CSV with the bank-transactions template.
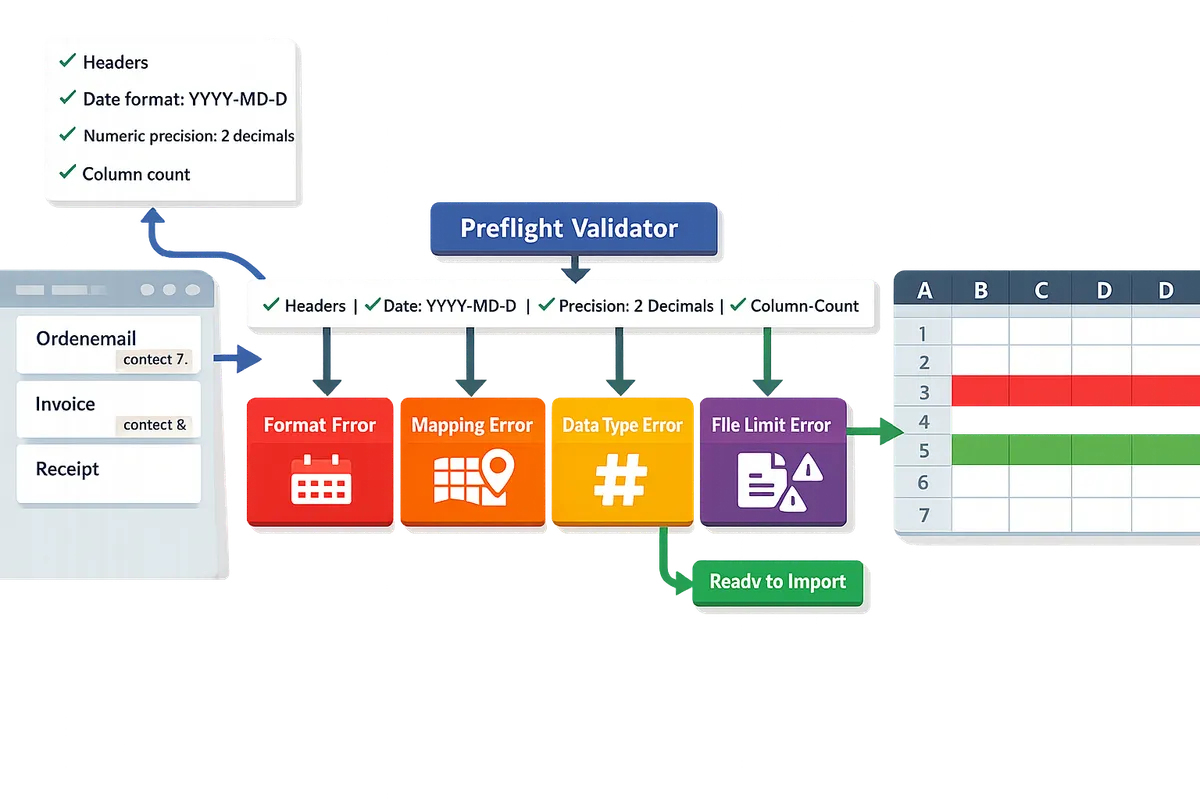
Triage flowchart for import failures 🔍
The triage flowchart is a one-page decision tree that classifies QuickBooks import failures into formatting, mapping, data-type, or file-limit problems and points to the exact fix. Start with the validator pass/fail summary, then follow the flowchart branch that matches the error type (for example: “invalid date format quickbooks online csv” routes to standardize dates; “header mismatch” routes to replace headers with the template headers; “too many columns” routes to remove extraneous columns to apply the quickbooks csv too many columns fix).
How to use the flowchart with the validator output:
- Run the validator and copy the pass/fail report. The report lists failing rows and error codes.
- Locate the corresponding flowchart branch for that error code.
- Apply the exact fix (replace header, reformat dates, trim columns, remove duplicate transactions) and re-run the validator.
- If errors persist, export fresh data from Xtractor.app using the mapped template and repeat.
The download package includes a printable PDF flowchart and an editable Google Slides version so you can add site-specific rules. Use the flowchart during a failed import to route the issue to the fastest business outcome: re-export, quick edit, or escalation to support.
Tip: Keep a short list of the most common fixes (date standardization, header swap, drop extra columns) next to your keyboard. That reduces troubleshooting time when a bookkeeping team hits a failed import.
For hands-on workflows that feed these templates, see our multi-context parsing guide and the custom parsing rules article to handle inconsistent email formats before export to Sheets. If you need a step-by-step on automating exports without code, follow the how-to export emails to Google Sheets tutorial.
How do I use the preflight validator and templates step by step? Start with a preflight checklist that validates headers, date formats, numeric precision, and column counts before mapping in QuickBooks Online.
Run the preflight validator in Google Sheets or Excel to catch header, date, numeric, and column-count errors before importing to QuickBooks Online. The preflight validator is a spreadsheet tool that enforces QuickBooks header names, accepted date patterns, decimal precision, and row/column limits so you avoid failed imports. Use the templates with the validator to reduce manual remapping and reclaim hours that bookkeeping teams normally spend fixing import errors.
Step-by-step preflight run in Google Sheets ✅
Open a working copy of the template in Google Sheets, import your CSV, and run the validator sheet to flag header, date, precision, and column-count issues. Follow these steps exactly:
- Duplicate the provided template (File > Make a copy) so you never alter the master.
- Import your CSV into the copy (File > Import > Upload > Select > Insert new sheet or Replace current sheet). Choose “Detect automatically” for separators only if your export uses commas.
- Go to the “Validator” tab. No macros are required; the sheet runs checks with built-in formulas. Click the “Run Checks” helper cell (clear instructions are in the template).
- Apply the validator’s auto-fixes for whitespace and thousands separators (buttons on the Validator tab). The fix removes leading/trailing spaces and strips commas from numeric fields so QuickBooks reads amounts correctly.
- Use the “Header Mapping” tab to align your column names to QuickBooks names. Change any header flagged in red to the exact QuickBooks header in the mapping dropdown.
- Re-run checks until the validator reports zero critical errors.
- Export the active sheet as UTF-8 CSV (File > Download > Comma-separated values (.csv, current sheet)). Google Sheets exports UTF-8 by default, so no extra encoding step is required.
If your data lands in Sheets from email parsing, xtractor.app exports directly into Google Sheets so you can skip CSV downloads and run the validator on live data. For one-click parsing and scheduled exports into Sheets, see the Email Parser to Google Sheets guide.
Tip: Keep a separate column called “Original Row” with the raw CSV line during validation. That makes it faster to compare before/after fixes.
Step-by-step preflight run in Excel 🖥️
Use Excel’s Text to Columns and Format Cells tools to normalize dates and numbers, run the validator sheet, then save the file as UTF-8 CSV for QuickBooks. Use this platform-specific sequence:
- Open the validator template in Excel and save a working copy.
- Import your CSV via Data > Get Data > From File > From Text/CSV (Windows) or use File > Import (Mac) and set delimiter to comma. Choose “Do not detect data types” if available to avoid Excel guessing formats.
- Use Text to Columns (Data > Text to Columns) to split fields if a single column imports with embedded delimiters. Choose “Delimited” and set comma as delimiter, then on the final step pick the intended data type for each column (Text for dates you want to coerce later).
- Normalize dates: select the date column and use Home > Number Format > Short Date or Format Cells > Date and pick the consistent format QuickBooks expects. On Windows use the MDY option in Text to Columns if dates import as text. On Mac, set columns to Text first then re-import to avoid automatic conversion to serial numbers.
- Clean thousands separators with Find & Replace (Ctrl/Cmd+H). Replace “,” with nothing only in Amount columns.
- Copy your cleaned sheet into the validator template (or paste into the template’s input sheet) and run the validator checks per the template instructions.
- Save as UTF-8 CSV. On Windows choose Save As > CSV UTF-8 (Comma delimited). On Mac, use File > Save As and choose “Comma Separated (.csv)” then Export > Change File Format > CSV UTF-8 if your Excel version separates these options.
Excel pitfalls to watch for: older Excel for Mac versions can convert dates to serial numbers and default to MacRoman encoding. If dates appear as five-digit numbers, re-import with the column set to Text and then apply a date format. When Excel refuses to save UTF-8, export the CSV and re-open in a text editor to re-save as UTF-8.
⚠️ Warning: Always verify the final CSV in a plain-text editor to confirm commas are separators and the file is UTF-8 encoded before importing into QuickBooks.
If your source is email data, exporting from xtractor.app to Excel already structures fields so you spend less time correcting date and thousands-separator issues. See Convert Bank Statement PDF to QuickBooksXtractor for workflows that feed Excel-ready outputs.
How to fix invalid date format quickbooks online csv and quickbooks csv too many columns fix 📌
Standardize all dates to QuickBooks-accepted patterns and reduce the CSV to the exact QuickBooks header set to avoid invalid-date and too-many-columns errors. Use these concrete fixes and rules of thumb:
- Accepted date patterns: MM/DD/YYYY, M/D/YYYY, and ISO YYYY-MM-DD usually import cleanly. If your export uses day-first (DD/MM/YYYY), convert to MM/DD/YYYY unless your QuickBooks region expects day-first.
- Coerce dates without formulas: in Google Sheets select the date column and choose Format > Number > Date, then pick the correct display. In Excel use Text to Columns and pick Date: MDY to force conversion. Avoid pasting dates into a preformatted column unless it is set to Text first.
- Fix too many columns: open the “Header Mapping” tab and compare your headers to the QuickBooks set. Remove columns only when they are purely internal (internal IDs, temporary notes) or duplicate another column. Keep columns that affect accounting entries (Date, Account, Amount, Payee, Memo).
- Merge memo fields when QuickBooks expects fewer columns: create a new “Memo” column and concatenate the content you need (for example, copy Notes + Reference into Memo). Do this with copy-paste if you want formula-free edits. Example before/after for one row:
Before: 2025-04-01, 12345, “Refund”, “Customer note here”, “Ref#ABC”
After: 04/01/2025, 12345, “Refund”, “Customer note here | Ref#ABC” - Copy-paste fixes for flagged rows: open the validator’s error log, sort by error type, then manually correct rows shown. For an invalid date like “4/31/2025”, change to a valid date or move the entry to a “Review” sheet. For amounts with currency symbols or parentheses, paste the raw number into the Amount column as plain text and re-run the cleaners.
- Rule-of-thumb for drop vs map: drop a column when it never maps to a QuickBooks field and adding it won’t change transaction balances. Map or merge when the column contains vendor, invoice, reference, or tax info that affects reconciliation.
The validator highlights offending rows and provides the exact column and row number to edit, so you do targeted fixes instead of reworking the whole file. xtractor.app reduces many of these issues at source by extracting dates and amounts consistently from emails and exporting them into a structured sheet ready for the validator.
How can I customize the templates and automate imports with xtractor.app? Customizing templates and automation with xtractor.app reduces manual preparation and feeds correctly formatted CSV or Sheets outputs into QuickBooks.
You can use xtractor.app to parse incoming emails into saved templates that export directly to a preflight-ready CSV or Google Sheet for QuickBooks. This removes repetitive copy/paste, standardizes headers and date formats, and reduces the number of failed imports caused by header or formatting errors. Below are practical examples, a comparison of import methods, and a schedule pattern you can copy.
Custom parsing examples for bank statements and receipts ✉️
Xtractor.app parsing contexts extract dates, amounts, and memos into columns that map directly to QuickBooks headers. Use a dedicated parsing context per email layout to ensure fields line up with the CSV template headers (Date, Payee, Memo/Description, Amount, Type). For example:
-
Bank notification emails parsed to a bank-transactions CSV.
-
Source: daily “payment received” emails from the processor. Fields extracted: TransactionDate -> Date, NetAmount -> Amount, PayerName -> Payee, Reference -> Memo.
-
Formatting note: convert TransactionDate to YYYY-MM-DD to avoid invalid date format quickbooks online csv errors during import.
-
Sample output row: 2026-05-19 | Acme Co. | Invoice 12345 | 125.00 | Deposit
-
Vendor receipts parsed into expense rows.
-
Source: receipt confirmations sent by vendors. Fields extracted: InvoiceDate -> Date, Total -> Amount, Vendor -> Payee, Category -> Account Name, Notes -> Memo.
-
For vendors with inconsistent layouts, add multiple parsing contexts and use saved searches for each sender or subject pattern so each vendor maps to the right template.
-
Sample output row: 2026-05-20 | OfficeSupply Inc. | Paper and toner | 78.40 | Office Supplies
Saved parsing contexts let you reuse a ruleset when a sender keeps the same structure. Use saved searches (by sender, subject, or date range) to target only the messages you want exported. See our Email Parser to Google Sheets step-by-step guide for a full setup and bulk import workflow: Email Parser to Google Sheets: Fast Setup, Bulk Imports, and Scheduling (Step-by-Step).
Tip: Standardize to ISO dates (YYYY-MM-DD) in the parsing output to prevent invalid date format quickbooks online csv failures during QuickBooks mapping.
When to use CSV import vs QBO import methods (comparison table) 📊
CSV imports are best for simple, repeatable transaction lists while QBO/OFX imports work better for native bank files and cases where automatic reconciliation is required. Below is a concise comparison to decide which route fits recurring versus one-off needs.
| Feature | CSV import | QBO / OFX import | Automated third-party sync (bank feed or sync tool) |
|---|---|---|---|
| Best use case | One-off uploads or small, curated transaction lists you control | Direct bank downloads for account-level reconciliation | Ongoing, automated balance and transaction sync for high-volume reconciliation |
| Prep effort | Low to medium. Requires correct headers and date/number formats | Low (download native file). May need minor mapping | Low after initial setup; needs credential setup and permissions |
| Error risk | Medium. Header mismatches, invalid date format quickbooks online csv, and extra columns cause most failures | Low for format errors but mapping still matters | Medium. Sync failures or duplicate transactions are the main issues |
| Mapping control | High. You decide each column-to-field mapping in QuickBooks | Medium. Bank files map automatically but account selection still needed | Low. Tool decides mapping; fewer manual mapping steps |
| Platform support | Universal. Works with Sheets, Excel, exports from xtractor.app | Supported by banks and many conversion tools | Supported where bank connectors exist (may not cover all banks) |
| Typical failure modes | quickbooks csv too many columns fix required, header typos, date and decimal separators | Currency mismatches, missing transactions in export | Broken credentials, delayed transactions, duplicates |
Recommendation: choose CSV import for repeatable reports you control and for one-off bulk edits. Choose QBO/OFX for direct bank file reconciliation and automated third-party sync for continuous, high-volume bookkeeping. For a step-by-step QBO conversion workflow, see our Convert Bank Statement PDF to QuickBooks article: Convert Bank Statement PDF to QuickBooks.
How to set up scheduled automation to keep QuickBooks synced ⏱️
Set scheduled xtractor.app exports to push parsed emails into Sheets or CSV on a cadence, run the preflight validator, and perform a quick manual review before importing to QuickBooks. Follow these practical steps:
- Define parsing contexts. Create one context per email template: bank notifications, vendor receipts, refunds, and so on. Use saved searches to scope each context by sender or subject.
- Configure export destination. Set the export to Google Sheets or an SFTP/CSV file that your bookkeeping team uses. Choose the file/worksheet that matches your preflight template headers.
- Schedule exports. Set daily or hourly exports depending on volume. For daily sales, choose end-of-day; for high-volume orders, choose hourly.
- Run the preflight validator. Add a simple trigger in Sheets (or a scheduled script) to run the preflight checks after each export. The validator should flag header drift, invalid date format quickbooks online csv, numeric precision, and extra columns.
- Manual quick review. Assign a 5–10 minute daily review to approve flagged rows, correct failed parses, and confirm totals before QuickBooks import.
- Import to QuickBooks. Use the validated CSV or Sheets export and map columns in QuickBooks. If QuickBooks flags “too many columns,” remove unused columns or match only the required headers as part of the quick review.
Monitoring checklist (daily):
- Failed parses in xtractor.app and count of unparsed emails.
- Changes in sender templates or subject lines causing header drift.
- Preflight failures by type: invalid dates, extra columns, or bad numbers.
- QuickBooks import rejection logs and reconciling mismatched totals.
Warning: Attachments are not parsed by default. If key data lives only in PDFs or image attachments, request custom parsing from us or follow the Convert Bank Statement PDF to QuickBooks workflow for a PDF-to-CSV route: Convert Bank Statement PDF to QuickBooks.
For complex inboxes with many sender templates, see our guides on multi-context parsing and custom parsing rules: Multi-Context Parsing to Handle Varying Email Layouts and Custom Parsing Rules for Emails with Inconsistent Formats.
Prepare CSVs that import cleanly with downloadable templates and a preflight validator.
The core takeaway: use our downloadable CSV templates and the preflight validator to avoid failed imports, save hours of cleanup, and speed reconciliation. QuickBooks Online CSV import troubleshooting is easier when you catch column mismatches and date-format errors before import. For common issues like invalid date format quickbooks online csv, the validator highlights the offending rows and shows the exact format QuickBooks expects.
Xtractor.app is an email parsing and data-extraction tool that pulls structured text out of emails and exports it directly into Google Sheets, CSV, or Excel. The product is designed to import thousands of emails in a single action or on a scheduled cadence, parse relevant fields (subject, sender, date, amounts, order numbers, etc.), and produce a clean, tabular output in a spreadsheet for reporting, analysis, or bookkeeping. Use that output to populate our templates or feed the preflight validator and skip manual rekeying.
Download the free preflight CSV validator and matching templates from our Email Parser to Google Sheets guide to run a quick check before every import. For statement-to-QBO workflows, see our Convert Bank Statement PDF to QuickBooks guide for the next steps.
Tip: Run the validator and a quick filter for blank cells before uploading to QuickBooks to prevent common import rejections.