A single misformatted CSV header can cost a small accounting firm hours of reconciliation and missed payments. QuickBooks bank transactions CSV import requires exact header names and column order; this guide compares 3-column vs 4-column formats with sample headers and Google Sheets mapping. Xtractor.app is an email parsing and data-extraction tool that pulls structured text out of emails and exports it directly into Google Sheets, CSV, or Excel, so you can bulk-prepare and validate transaction rows before import. This integration connects your inbox to Google Sheets via xtractor.app, applies custom filters and saved parsing contexts, and usually takes about 20–45 minutes to configure. Follow the Email Parser to Google Sheets workflow to see which header format cuts manual remapping and speeds daily imports.
What do I need to prepare before importing QuickBooks bank transactions from CSV?
Prepare a validated CSV, a mapped Google Sheet, and confirmed QuickBooks account and user permissions before you start the import. These three items cut common errors that cause partial imports, mismatched reconciliations, and hours of clean-up. The checklist below shows supported file types, the permissions to confirm in QuickBooks Online or Desktop, and the exact validation steps to run in Google Sheets.
What file types and QuickBooks versions are supported? 🗂️
QuickBooks Online accepts CSV or QBO imports and QuickBooks Desktop accepts CSV and Web Connect (QBO) files. QuickBooks Online uses Banking > Upload transactions for CSV imports; QuickBooks Desktop often requires Bank Feeds or the Web Connect path for QBO files. Choose CSV when you need simple, repeatable spreadsheets and choose QBO when you want the bank-level import that preserves bank IDs.
xtractor.app can export parsed emails and bank data directly to Google Sheets or CSV to match your chosen path. If you receive statements by email, use our email-to-sheet workflow to produce a clean CSV ready for QuickBooks. For workflows that require a QBO file, see the Convert Bank Statements to QBO guide for conversion steps and mapping tips.
Which QuickBooks account and user permissions must be set? 🔐
You must have access to the target bank account in Chart of Accounts and Admin or Accountant permissions with import privileges. Without those permissions you risk partial imports, inability to map to the correct account, and reconciliation differences. Confirm the account name in QuickBooks matches the account name you will use in the CSV or mapped Google Sheet. If you keep multiple bank accounts, add an explicit Account column in the sheet so QuickBooks maps each row to the correct ledger account.
Use xtractor.app to tag each parsed row with the target account name before exporting to CSV if your emails cover multiple accounts. That reduces manual edits and prevents accidental imports into the wrong QuickBooks bank account.
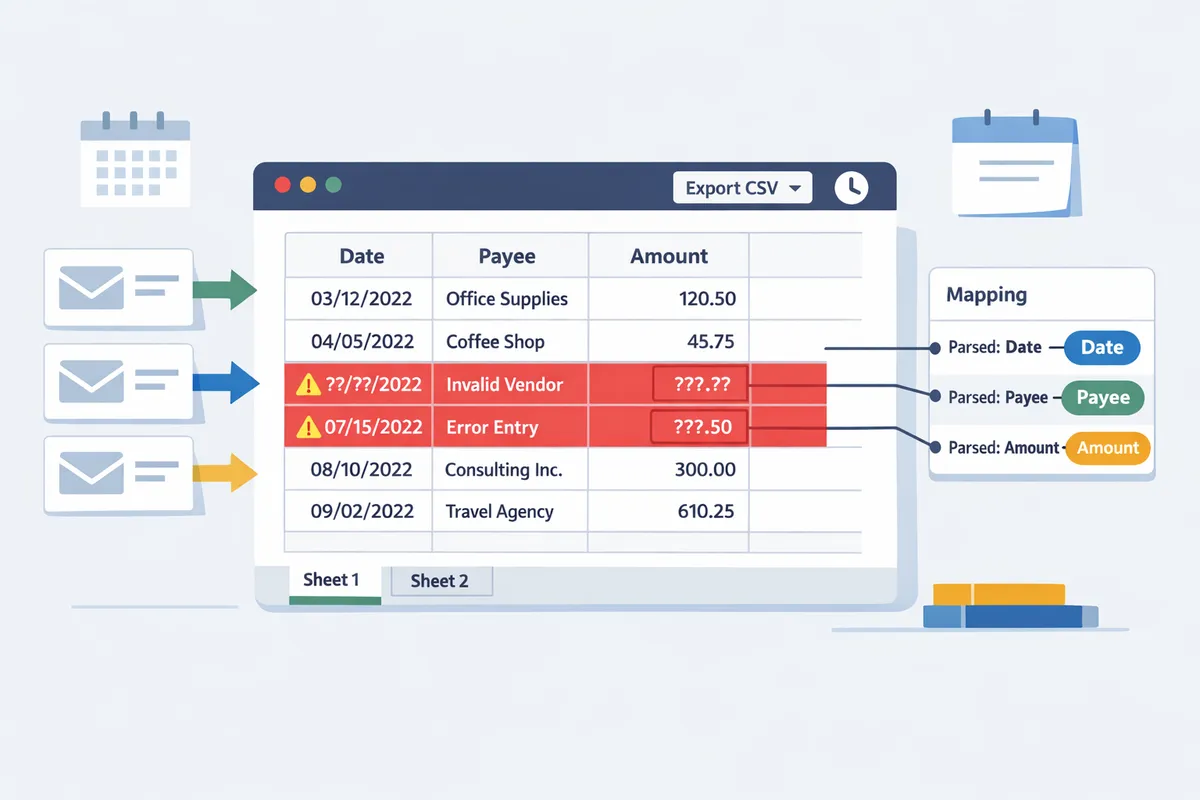
What preflight validations should I run on the CSV? ✅
Run three quick checks before uploading: consistent date format, numeric amounts without thousands separators, and one transaction per row. Check dates are uniformly MM/DD/YYYY or YYYY-MM-DD to match your QuickBooks locale. Remove commas from amounts so values upload as numbers. Ensure you use either a single Amount column (positive and negative values) for QuickBooks 3-column imports or separate Debit and Credit columns for 4-column imports.
Sample header rows you can paste into Google Sheets:
- QuickBooks 3-column CSV format example:
Date,Payee,Amount
- QuickBooks 4-column CSV format example:
Date,Payee,Debit,Credit
Follow this numbered preflight checklist in Google Sheets:
- Confirm header row matches one of the sample headers above exactly. QuickBooks matches header text and order.
- Use a column to verify date parseability for the first 10 rows (e.g., enter example dates in target format).
- Check amounts: run a quick sum on Amount or Debit minus Credit to confirm totals match the closing balance on the statement.
- Scan for empty Date or Amount cells and flag them with conditional formatting.
- Import a 20-row sample to QuickBooks first to validate mapping and reconcile the sample with the bank statement.
💡 Tip: Keep the original CSV and a copy of the mapped Google Sheet before editing. You can revert quickly if mapping or formatting causes import errors.
xtractor.app exports structured data directly into Google Sheets with consistent headers and scheduled runs, which removes a large portion of manual cleanup needed for QuickBooks bank transactions CSV import. For a step-by-step setup that parses emails into Sheets and saves reusable parsing contexts, see our Email Parser to Google Sheets guide. If you start from PDFs instead of emails, our Convert Bank Statement PDF to QuickBooksXtractor article walks through extracting and cleaning statement data into an import-ready CSV.
How do I set up 3-column and 4-column CSV formats and map them in Google Sheets for QuickBooks?
Create two tidy Google Sheets templates — one for the 3-column layout (Date, Description, Amount) and one for the 4-column layout (Date, Description, Debit, Credit) — and use a dedicated mapping tab to match sheet columns to QuickBooks fields before exporting a CSV. This prevents header mismatches, sign errors, and repeated manual edits during import. Our xtractor.app workflows can populate those templates directly from parsed emails, reducing data-cleaning time.
What is the QuickBooks 3-column CSV format? 📄
The QuickBooks 3-column CSV format is Date, Description, and Amount columns; QuickBooks infers debit versus credit from the sign of Amount. For QuickBooks imports, use the exact header names Date, Description, Amount. Sample header row for a 3-column file:
Date,Description,Amount
Example rows:
2026-05-01,Office Supplies,-152.34
2026-05-03,Client Payment,2050.00
Use negative numbers for outflows and positive for inflows. In Google Sheets normalize dates to a single format (for example YYYY-MM-DD or MM/DD/YYYY to match your QuickBooks region) and remove thousands separators and currency symbols. Our xtractor.app can parse email amounts into a clean Amount column so the sheet already contains signed numbers ready for mapping.
What is the QuickBooks 4-column CSV format? 📑
The QuickBooks 4-column CSV format separates amounts into Debit and Credit columns so each row explicitly marks outflows and inflows. Required header names are Date, Description, Debit, Credit. Sample header row for a 4-column file:
Date,Description,Debit,Credit
To convert a single Amount column into Debit and Credit in Google Sheets, use simple formulas referencing the Amount cell. For example, if Amount is in C2:
- Debit (D2): =IF(C2<0,ABS(C2),””)
- Credit (E2): =IF(C2>0,C2,””)
QuickBooks expects the non-applicable side to be blank, not zero. Our xtractor.app can produce separate debit/credit fields when parsing emails that label transaction direction, or output a single Amount column that you split in Sheets using the formulas above. For varying email formats, see our multi-context parsing guide to extract direction reliably.
What universal CSV template should I use and which sample headers work best? 🧾
Use a universal template with columns Date, Description, Debit, Credit, Payee (optional), and Bank Account (optional) so a single sheet covers both QuickBooks 3 column vs 4 column CSV format scenarios. Two compact examples that work as starting points:
3-column export template header:
Date,Description,Amount,Payee,Bank Account
4-column export template header:
Date,Description,Debit,Credit,Payee,Bank Account
For QuickBooks imports, ensure the core headers match QuickBooks names (Date, Description, Amount or Date, Description, Debit, Credit). Keep optional columns after the core fields; QuickBooks ignores extra columns but mixed ordering often triggers mapping errors. Our xtractor.app can fill Payee and Bank Account columns from parsed email fields so you do not type them manually. For converting PDFs of statements into this universal template, see our Convert Bank Statement PDF to QuickBooks guide.
💡 Tip: Freeze the header row and keep a single mapping row above your data to avoid accidental shifts when xtractor.app appends new rows.
How do I map Google Sheets columns to QuickBooks fields before export? 🧭
Map Google Sheets columns to QuickBooks with a dedicated mapping tab that lists each Sheet header alongside the QuickBooks target field and shows a preview of normalized values. Follow these steps:
- Create a tab named mapping and copy the sheet header row into column A of that tab. Put the corresponding QuickBooks field name in column B (for example Date -> Date, Description -> Description, Debit -> Debit, Credit -> Credit, Bank Account -> Account). Use exact QuickBooks field names where required.
- Add a preview row that shows normalized values using formulas: a normalized date cell (TEXT(DateCell,”yyyy-mm-dd”)), an amount clean step (VALUE(SUBSTITUTE(SUBSTITUTE(AmountCell,”,”,””)) ) ) and debit/credit split formulas if you started with Amount.
- Normalize common bank quirks: convert parentheses to negative (eg, =IF(LEFT(AmountCell,1)=”(“, -VALUE(SUBSTITUTE(SUBSTITUTE(AmountCell,”(“,””),”)”,””)), VALUE(AmountCell))).
- Populate a Bank Account column with the exact QuickBooks account name used in your chart of accounts to avoid account-mapping prompts during import.
- Lock the mapping row or keep it on a separate sheet so exported CSVs contain only transaction rows.
Our xtractor.app can write parsed fields directly into the data tab and apply normalization rules on export, so the mapping tab becomes a validation step instead of a manual copy task. For end-to-end automation from email to mapped sheet, see our Email Parser to Google Sheets walkthrough and the multi-context parsing guide for mixed email layouts.
💡 Tip: Use data validation dropdowns for the Account column to ensure you always export an exact QuickBooks account name.
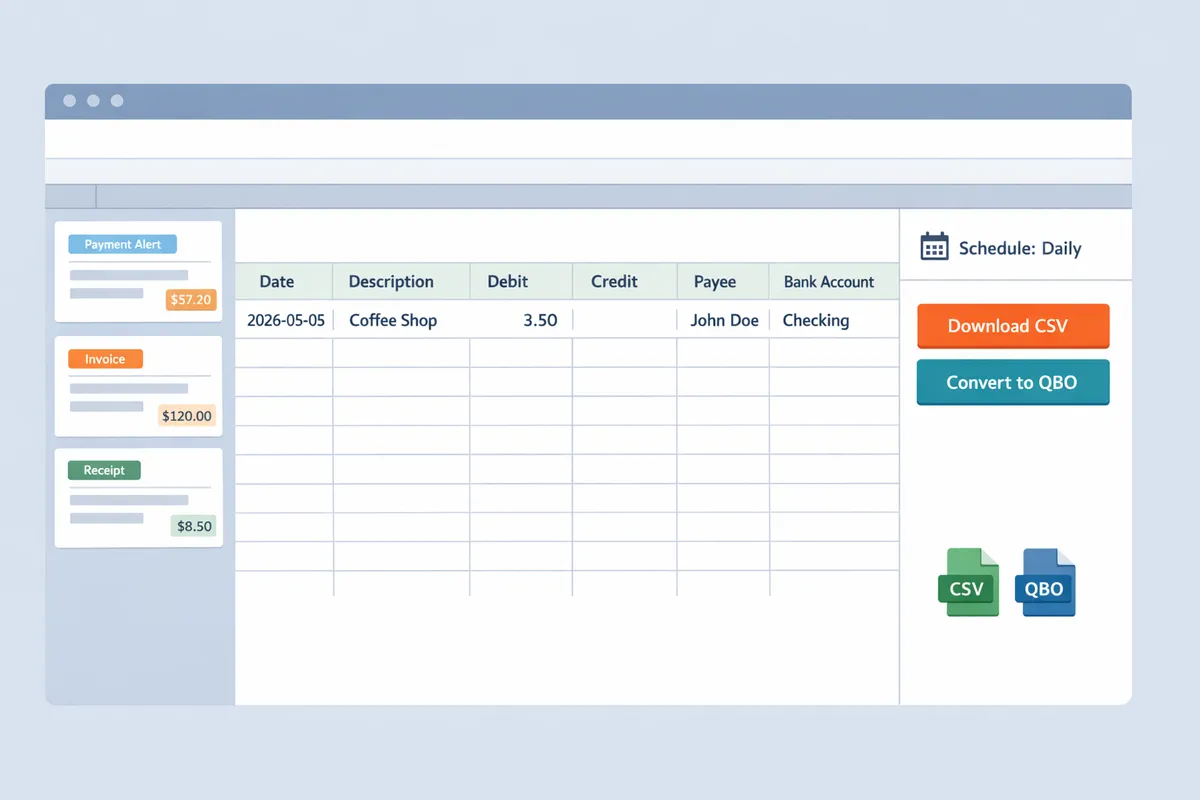
How do I export the mapped Google Sheet to a QuickBooks-ready CSV? 📤
Export the mapped sheet as a UTF-8 CSV, verify the first and last rows contain only transactions, and run a small test import of 10 to 20 rows before full upload. Follow these steps:
- Make a copy of the mapped sheet and on the copy do a Paste values on the data range so no formulas remain. This prevents formula text appearing in the CSV.
- Remove any summary rows, filters, and hidden columns. Check for leading apostrophes in numeric cells and remove them with VALUE or by reformatting to Number.
- Clean hidden characters: add a helper column with =TRIM(CLEAN(Cell)) and replace original text with the cleaned values.
- Download CSV: File > Download > Comma-separated values (CSV, current sheet). Google Sheets exports UTF-8 by default; if you open the file in Excel, re-save as UTF-8 to avoid encoding issues.
- Open the CSV in a plain-text editor and confirm the header row matches QuickBooks exact field names and that there are no stray commas or footer notes from the bank statement.
- Import a small batch into QuickBooks. Reconcile one or two deposits and withdrawals to confirm mapping and sign conventions.
⚠️ Warning: Do not include bank summary rows, headers repeated on each page, or extra commas; these cause QuickBooks to reject the import and cost hours to fix.
Our xtractor.app can schedule exports to Google Sheets so the mapped sheet is always up to date and ready for CSV download; combine that with the Convert Bank Statements to QBO guide when you prefer QBO files over CSV for QuickBooks Online imports.
How do I test, validate, and import the CSV into QuickBooks without risking reconciliation errors?
Run a controlled 10-row test import, confirm field mapping in QuickBooks, then reconcile those ten transactions to a bank statement before importing the full file. This short cycle catches date parsing, debit/credit direction, payee names, and split transactions that cause reconciliation drift. Use xtractor.app to produce a clean Google Sheets or CSV export so your sample matches the import-ready format.
What quick tests should I run with a 10-row sample? 🔬
Import a 10-row sample that contains at least one debit, one credit, one refund, one fee, and one split or transfer to verify real-world parsing and mapping. Use xtractor.app to filter and export 10 representative emails or statement lines into Google Sheets, then format them into your 3-column or 4-column template (Date | Description | Amount) or (Date | Description | Debit | Credit).
Follow these steps exactly.
- Export 10 representative rows from xtractor.app into Google Sheets. Include varied date formats and at least one multi-line description.
- Standardize the date format (example: YYYY-MM-DD for shared teams, or MM/DD/YYYY if your QuickBooks locale expects it). Verify with QuickBooks sample import if unsure.
- If using 4-column CSVs, ensure debit and credit do not both contain values on the same row; leave the unused column blank.
- Save as CSV and import into QuickBooks Online or convert to QBO for Desktop using our Convert Bank Statements to QBOXtractor guide if required.
- In QuickBooks’ mapping step, confirm the Date, Description/Payee, and Amount/Debit-Credit mapping match what you see in your sheet.
Check results immediately: Confirm the sample transactions appear in the right bank account, the amounts have correct signs, and payee names are readable for reconciliation.
What preflight validation checklist prevents common import failures? 📝
Run this preflight checklist to avoid partial imports, mismatched balances, or rejected rows. Each check addresses a common failure point seen in real bookkeeping workflows.
- Confirm one consistent date format across all rows. Mixed formats cause incorrect month/day parsing.
- Use a single currency per CSV file. Mixed currencies trigger import warnings.
- Match header names to QuickBooks mapping expectations (Date, Description, Amount or Date, Description, Debit, Credit).
- Ensure debit and credit columns are not both populated on the same line for 4-column files.
- Remove stray characters from Amount cells (commas for thousands are okay if QuickBooks locale accepts them; remove currency symbols if QuickBooks mapping expects raw numbers).
- Include a bank account column when importing transactions for multiple accounts in one file.
- Recalculate totals: sum(credits) minus sum(debits) must equal the bank statement change for the same period.
⚠️ Warning: Always back up your QuickBooks company file or test in a sample company before a bulk import to avoid irreversible changes.
Use xtractor.app to enforce consistency: create a parsing context that outputs Date, Description, and a single Amount column or separate Debit/Credit columns. For guidance on building scheduled extraction into Google Sheets, see our Email Parser to Google Sheets: Fast Setup, Bulk Imports, and Scheduling (Step‑by‑Step).
How do QuickBooks Online and Desktop imports differ? 📊
QuickBooks Online accepts CSV imports with an interactive mapping wizard while QuickBooks Desktop prefers Web Connect or QBO files and often requires a conversion step for cleaner bank imports. Below is a side-by-side comparison to help you pick the lowest-risk path.
| Feature | QuickBooks Online | QuickBooks Desktop (Pro/Premier) |
|---|---|---|
| Preferred file type | CSV (interactive mapping) or QBO | QBO/Web Connect preferred; CSV needs careful mapping or conversion |
| Mapping flexibility | Wizard lets you map Date, Description, and Amount or Debit/Credit | Limited CSV support; Desktop mapping is less forgiving and may require manual fixes |
| Multiple bank accounts in one file | Supported if you include an account column and map it | Safer to import per-account using QBO files or separate CSVs |
| Typical time to complete a small import | 5–15 minutes for a 10–50 row test including mapping | 10–30 minutes including conversion to QBO and validation |
| Recommended approach for large volumes | Use CSV exports from xtractor.app to Google Sheets, validate, then import | Convert CSV to QBO using a conversion tool or follow the Convert Bank Statements to QBOXtractor workflow |
If you use bank statement PDFs as a source, follow our Convert Bank Statement PDF to QuickBooksXtractor walkthrough to extract and clean rows before testing. xtractor.app fits both paths: export clean CSVs for QBO import or produce consistent CSVs that map reliably in QuickBooks Online.
How should I reconcile after import to ensure balances match? 🔁
Reconcile imported transactions against your statement using a two-step method: match cleared items first, then investigate the remaining uncleared or split transactions. This method isolates simple matches from complex issues and reduces reconciliation time.
Follow this reconciliation checklist.
- Verify beginning balance. The opening balance in QuickBooks must match the statement opening balance for the reconciliation period.
- Match obvious cleared items first: mark deposits and payments that appear exactly on the bank statement.
- Investigate uncleared items: check date offsets (cleared next statement), split transactions, and rounding differences.
- For any unmatched amounts, cross-check the original CSV row in Google Sheets exported by xtractor.app to confirm the description and amount were parsed correctly.
- If totals still differ, run a quick trial import of only the mismatched rows into a test account to see how QuickBooks records them.
💡 Tip: Keep an “Import Audit” tab in your Google Sheet that records the original email line, parsed fields, and the row ID from QuickBooks after import. That trace makes fixups and adjustment entries faster.
For complex cases with many formats, set up multi-context parsing so xtractor.app produces consistent output across templates; see Multi-Context Parsing to Handle Varying Email Layouts: Step-by-Step Setup with Real-World Templates. If you need a conversion route to QBO for Desktop, follow Convert Bank Statements to QBOXtractor to avoid manual mapping errors.
How do I automate CSV creation and handle edge cases using xtractor.app and Google Sheets?
You can automate CSV creation and correct messy bank exports by using xtractor.app to parse emails into Google Sheets, then apply normalization tabs, formulas, and validation rules to produce QuickBooks-ready CSVs. xtractor.app is an email parsing and data-extraction tool that writes structured rows into Sheets on a schedule so you avoid manual copy-paste and reduce transcription errors. The steps below show a repeatable workflow for scheduled imports, common fixes for merged fields, and fast troubleshooting for QuickBooks bank transactions CSV import.
How can xtractor.app automate bank transaction CSVs from email feeds? 🤖
xtractor.app can parse bank emails on a schedule and write structured transaction rows into Google Sheets for CSV export. Set up a saved search (Gmail filter or inbox query) that captures the bank emails you want, then create a parsing context in xtractor.app that extracts Date, Description, Amount, and any reference numbers. Use one-click bulk import to backfill historical messages and enable scheduling to run daily or hourly.
Practical steps our website recommends:
- Create a Gmail saved search that matches exact subjects or senders for your bank statements.
- Add a parsing context in xtractor.app for that template and map fields to column names used in your QuickBooks mapping tab.
- Run a one-click bulk import to populate a test sheet with 10–20 rows and verify mapping.
- Enable the schedule and point output to the Google Sheet that holds your QuickBooks CSV template.
For mixed email layouts, use multi-context parsing. See our detailed setup for email-to-Sheets parsing in the Email Parser to Google Sheets guide and the Multi-Context Parsing walkthrough for real-world templates.
How do I handle non-standard bank CSV layouts and merged fields? 🔧
Split merged fields and normalize column order using either an extra parsing context in xtractor.app or formula tabs in Google Sheets. If the bank email combines “Date | Description | Amount” into one line, create a dedicated parsing context that captures each piece. If that is not possible, use a normalization tab in Sheets with formulas to split and clean the raw column into QuickBooks-ready columns.
Quick formula examples you can copy into a normalization tab:
- Split a merged cell: =SPLIT(TRIM(A2),”|”) to separate “Date | Description | Amount” into three cells.
- Strip currency and commas: =VALUE(SUBSTITUTE(SUBSTITUTE(B2,”$”,””),”,”,””)) to convert “$1,234.56” into 1234.56.
- Route Debit/Credit from a signed Amount: =IF(C2<0,ABS(C2),””) for Debit and =IF(C2>0,C2,””) for Credit.
Keep a single mapping tab with headers matching QuickBooks 3 column vs 4 column CSV format (Date, Description, Amount) or (Date, Description, Debit, Credit). Our website recommends exporting a small sample CSV after normalization and validating it against QuickBooks field mapping before a full import. For PDFs or attachment-heavy workflows, see Convert Bank Statement PDF to QuickBooksXtractor for additional conversion steps.
What troubleshooting steps fix import errors like date mismatches or wrong signs? 🛠️
Standardize the spreadsheet locale and clean amounts and date strings before export to fix date mismatches, sign errors, and stray separators. First, set File > Spreadsheet settings > Locale to match the date format your QuickBooks instance expects. Next, run three checks across a sample import: date parsing, amount normalization, and stray character removal.
Quick corrective actions:
- Date mismatches: If dates show as text, convert with =DATEVALUE(TRIM(A2)) or split day/month/year tokens and rebuild with DATE(year,month,day). Check locale if DATEVALUE fails.
- Wrong signs: Convert parentheses or trailing CRs by replacing “(” and “)” then use =VALUE(…) and split into Debit/Credit columns as shown above.
- Stray separators: Remove non-numeric characters with SUBSTITUTE and ensure decimals use a dot if QuickBooks expects dot decimals.
💡 Tip: Set the Google Sheet locale before running DATEVALUE or you will get swapped day/month values on import.
If an import still fails, run a controlled 10-row test import and reconcile those rows in QuickBooks to isolate mapping errors. Our Convert Bank Statements to QBOXtractor guide shows a recommended test-and-reconcile workflow.
When should I use scheduled automation vs manual imports? ⏰
Use scheduled automation when emails arrive regularly in the same format and use manual imports for one-off or highly variable templates. The business trade-off is straightforward: automation saves repeated labor and reduces transcription errors, while manual imports work when templates change frequently and cost less time to adapt than building a new parsing context.
Decision checklist:
- Frequency: If you import similar files more than five times per month, schedule automation.
- Consistency: Use multi-context parsing in xtractor.app when templates vary but repeat; otherwise handle single irregular exports manually.
- Risk: Automate routine imports that feed month-end reconciliation to keep cadence predictable and reduce missed transactions.
See our step-by-step Email Parser to Google Sheets guide for scheduling details and Linking Emails to Google Sheets for setup scenarios where inbox organization matters.
Frequently Asked Questions
This FAQ answers practical questions bookkeepers and small accounting teams have about QuickBooks bank transactions CSV import, Google Sheets mapping, and using xtractor.app to automate parsing. xtractor.app is an email-to-sheet parsing tool that extracts transaction fields into Google Sheets and applies parsing rules so you spend less time cleaning exports and more time reconciling.
💡 Tip: Run a 10-row test import and keep a pre-import backup of your CSV to minimize reconciliation work if mapping goes wrong.
Choose the 3-column format when your bank export provides a single signed Amount column; choose the 4-column format when the source separates Debit and Credit into distinct columns. 3-column layouts (Date, Description, Amount) work well when debits are negative and credits are positive. Use 4-column (Date, Description, Debit, Credit) when the export splits direction, signs are inconsistent, or you must avoid QuickBooks guessing direction. Example: corporate card statements that already separate debit and credit should keep 4-column to prevent mis-posted credits. Edition note: QuickBooks Online accepts either layout but still requires you to pick the single bank account at upload time; QuickBooks Desktop import tools differ. Our xtractor.app workflows can normalize signed amounts or output separate Debit/Credit columns depending on the parsing template; see the Email Parser to Google Sheets guide for setup and examples.
QuickBooks Online does not support importing multiple bank accounts from one CSV; it imports all rows into the single bank account you choose during the upload. Edition note: some Desktop import paths or third-party importers accept an Account column, but QuickBooks Online’s CSV importer ignores per-row destination accounts. Best practice: split exports into separate CSVs per bank account so each file uploads to its correct register. xtractor.app can tag parsed rows with an account name during extraction (for example, by using sender or subject rules) so the sheet includes a mapped Account column before you export if you prefer to automate the split.
QuickBooks rejects CSV imports when date formats or invalid entries do not match the company locale or contain extra characters. For example, mixed MM/DD/YYYY and DD/MM/YYYY rows often trigger rejections. Fixes in Google Sheets: standardize the date column via Format > Number > Date or add a conversion column that outputs YYYY-MM-DD or your company locale format. Remove invisible characters with TRIM and CLEAN, and replace placeholders like “—” with blank cells. After cleaning, export as CSV UTF-8 and run the 10-row test import to confirm QuickBooks accepts the format.
xtractor.app handles varied email layouts by letting you create multiple parsing contexts and saved filters so each template extracts the correct fields into Google Sheets. Create one parsing context per distinct layout (for example, monthly bank notices and payment confirmations) and test each on a sample batch to confirm date, description, and amount extract reliably. Use saved filters to target messages by sender, subject, or date range before bulk extraction. If you need attachments or non-standard formats, request a custom parsing rule. For a production multi-template setup, see our Multi-Context Parsing guide and the Email Parser to Google Sheets walkthrough.
Fix wrong-column amounts by matching your CSV layout to the import mapping QuickBooks expects. First confirm the mapping in QuickBooks. If QuickBooks expects Debit/Credit but your CSV has a signed Amount column, add two helper columns in Google Sheets: Debit equals the absolute value when Amount is negative, otherwise blank; Credit equals Amount when Amount is positive, otherwise blank. Conversely, if you have separate Debit and Credit columns but QuickBooks expects Amount, add an Amount column that subtracts Debit from Credit. Re-export and run the 10-row test import. xtractor.app can output Debit and Credit fields directly from parsing templates so you avoid manual post-processing.
You can validate thousands of rows in Google Sheets using validation rules, conditional formatting, and a filtered error report. Follow these steps to build a repeatable validation tab:
- Add validation rules that flag non-date cells in the Date column.
- Use conditional formatting to highlight non-numeric or empty amounts.
- List account names that do not match your chart of accounts with COUNTIF and surface those rows.
- Use FILTER or QUERY to pull error rows to the top of the sheet for bulk fixes.
- Run a 10-row sample import to confirm QuickBooks behavior before full upload.
Save the validation rules as part of your template and pair the sheet with an xtractor.app scheduled job to populate rows automatically; this reduces manual review time for recurring imports and cuts the risk of mis-posted transactions. For PDF-to-CSV workflows, consult our Convert Bank Statement PDF to QuickBooksXtractor and Convert Bank Statements to QBOXtractor guides for end-to-end validation steps.
Prepare, validate, and map your CSV for a smooth QuickBooks bank transactions CSV import.
Choosing the right header layout and validating sample rows in Google Sheets prevents most import errors and saves hours of cleanup. For many bookkeepers, the difference in QuickBooks 3 column vs 4 column CSV format is whether amounts arrive as a single signed column or split into debit and credit. Map sample headers, run a small test import, and correct date and amount formats before processing the full file to avoid reconciliation mismatches.
💡 Tip: Run a 10-row test import and confirm dates, decimal separators, and positive/negative amounts match QuickBooks before importing large batches.
Xtractor.app is an email parsing and data-extraction tool that pulls structured text out of emails and exports it directly into Google Sheets, CSV, or Excel. If your transactions arrive by email, follow our Email Parser to Google Sheets guide to set up parsing contexts and scheduling, or use Convert Bank Statement PDF to QuickBooks for PDF sources. Start a free trial of Xtractor.app and create your first parsing workflow to produce a validated CSV ready for QuickBooks import.