Inconsistent email receipts force small accounting teams to spend 4–10 hours weekly cleaning data before import. QuickBooks CSV import from Google Sheets is a workflow that converts parsed email data into bookkeeping-ready CSVs for direct upload to QuickBooks or Xero. Xtractor.app is an email parsing tool that pulls structured fields from thousands of emails into Google Sheets, CSV, or Excel for Email Parsing to Sheets workflows, with one-click bulk imports, custom filters, saved searches, and scheduling. Our best-practices guide compares manual methods, Apps Script, and third-party tools, explains when using Xtractor.app cuts bookkeeping time and reduces transcription errors, and asks which approach offers the fastest, lowest-risk path from inbox to accounting for bank transactions, bills, and journal entries?
What CSV formats and fields does QuickBooks require for imports from Google Sheets?
QuickBooks requires specific column headers and consistent date, numeric, and account formats for CSV imports from Google Sheets. Follow exact header names and predictable formatting to avoid import rejections. The examples below give copy-paste header rows, validation checks, and a mapping table that links common email fields to QuickBooks column names.
Which QuickBooks entities need which columns? 🧾
Each QuickBooks entity requires a distinct set of CSV headers; use the table below for copy-paste header templates.
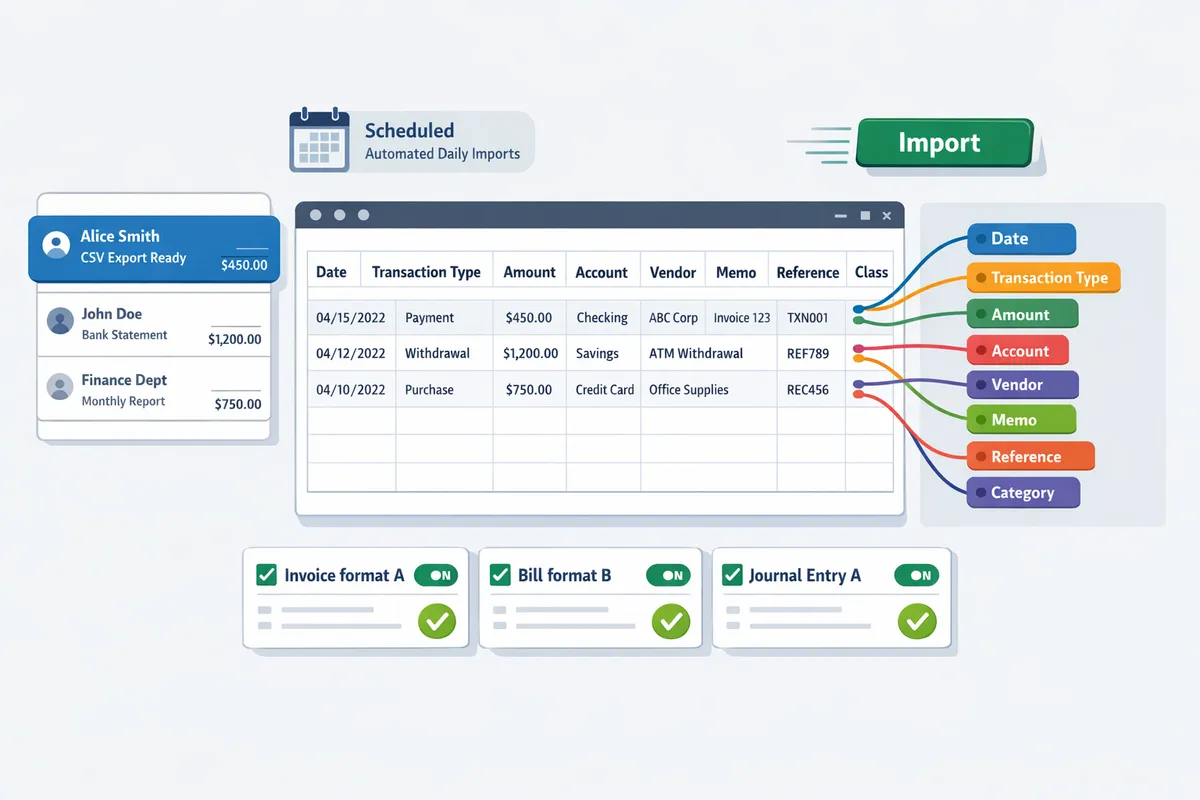
Xtractor.app can export parsed email fields directly into these header layouts so you can bulk-export a CSV that matches QuickBooks’ expectations.
| Entity | Required headers | Common optional headers | Copy-paste sample header row (CSV) |
|---|---|---|---|
| Bank Transactions | Date, Description, Amount, Account | Payee, Reference, Class | Date,Description,Amount,Account,Payee,Reference,Class |
| Bills | Vendor, Bill Date, Due Date, Amount, Account | Bill No, Memo, Currency | Vendor,Bill Date,Due Date,Amount,Account,Bill No,Memo,Currency |
| Invoices | Customer, Invoice Date, Due Date, Invoice No, Amount, Item | Description, Qty, Rate, Terms | Customer,Invoice Date,Due Date,Invoice No,Amount,Item,Qty,Rate,Description |
| Customers | Display Name, Company Name, Email, Billing Address | Phone, Resale Number | Display Name,Company Name,Email,Billing Address,Phone,Resale Number |
| Items (Products/Services) | Name, Type, Sales Price, Income Account | SKU, Purchase Cost, Expense Account | Name,Type,Sales Price,Income Account,SKU,Purchase Cost,Expense Account |
| Journal Entries | Date, Line, Account, Debit, Credit, Memo | Entity, Class | Date,Line,Account,Debit,Credit,Memo,Entity,Class |
Use these header rows verbatim. Small variations in header text cause QuickBooks to skip columns or reject the file. If you use different column names inside Google Sheets, map them to the exact headers above before export.
Refer to our step-by-step setup for exporting parsed email fields to Google Sheets in Email Parser to Google Sheets: Fast Setup, Bulk Imports, and Scheduling (Step‑by‑Step) to create template-based parsing contexts that populate these headers automatically.
How should dates, currencies, and negative amounts be formatted? 📅💲
Dates must match QuickBooks regional settings and amounts must be plain numbers with a period as the decimal separator; mismatched formats cause most parse failures.
QuickBooks commonly accepts YYYY-MM-DD or MM/DD/YYYY depending on your company settings. Confirm your QuickBooks date format under Account and Settings before export.
Practical rules and checks to run in Google Sheets before exporting:
- Standardize dates. Convert all date columns to either YYYY-MM-DD or MM/DD/YYYY using DATEVALUE or TEXT functions so QuickBooks reads them consistently. Example: TEXT(A2,”yyyy-mm-dd”).
- Strip currency symbols. Remove $, €, and other symbols so Amount is a plain numeric value. QuickBooks reads currency from the company file, not from symbols in a column.
- Use a period for decimals. Replace commas used as thousand separators (1,234.56 → 1234.56). Find and remove commas with SUBSTITUTE before export.
- Represent negatives consistently. Use a leading minus ( -123.45 ) or separate Debit and Credit columns for journal entries. Parentheses often import as text.
Quick validation checklist you can run in a spare column:
- FIND(“,”,Amount) returns an error if commas remain. Use this to flag rows.
- ISNUMBER(DATEVALUE(Date)) confirms dates parse.
- COUNTIF(AccountRange,AccountName) verifies account names exist in QuickBooks chart of accounts.
Xtractor.app can populate date and amount fields in the correct format during parsing so you avoid manual conversions. For examples of automatically cleaning and exporting dates and amounts, see How to Automatically Export Emails to Google Sheets: A Step-by-Step Guide.
⚠️ Warning: Commas in numeric fields and mixed date formats are the two most frequent causes of QuickBooks import failures. Run the validation checklist above on a sample of 50 rows before exporting the entire CSV.
What field-mapping errors cause the most import rejections? ⚠️
Missing required headers, wrong account names, and extraneous columns cause the majority of QuickBooks import rejections.
Map email fields to QuickBooks column names exactly and validate account and item names against your QuickBooks lists.
Common email-to-QuickBooks mapping examples:
| Email field from order or vendor email | QuickBooks CSV column to use | Notes / validation |
|---|---|---|
| Order number, PO # | Invoice No or Bill No | Use the exact header expected by the entity. Avoid adding prefixes in the CSV header. |
| Invoice date, Order date | Invoice Date | Standardize to company date format before export. |
| Total, Grand total | Amount | Strip currency symbols and thousand separators. |
| Line item description | Description or Item | For invoices, include Item plus Qty and Rate columns if selling products. |
| Payment reference | Reference or Memo | Optional, but keeps bank rules and reconciliation easier. |
Pre-import checklist (step-by-step):
- Confirm header row matches one of the copy-paste templates above.
- Run date and number validations on a sample of rows.
- Cross-check each Account, Customer, Item name against QuickBooks lists.
- Remove extra columns not present in your header template. QuickBooks will often fail on unknown columns.
- Export CSV using File > Download > Comma-separated values (.csv) from Google Sheets.
Xtractor.app reduces mapping errors by saving parsing contexts that place parsed values into the exact Google Sheets columns QuickBooks expects. If emails vary, save multiple parsing contexts so each format maps to the same CSV headers.
For reusable templates and validation rules, download our QuickBooks Import Excel and CSV Toolkit download and templates and pair it with the parsing setup in Linking Emails to Google Sheets to shorten testing time and reduce errors.
Which workflow is faster and lower risk: native QuickBooks import or automated parsing with Xtractor.app?
Automated parsing with our product xtractor.app is faster and lower risk for recurring or high-volume email imports, while native QuickBooks import is reasonable for one-off, low-volume uploads. Small accounting teams often spend 4–10 hours weekly cleaning inconsistent email receipts before import; using a parser reduces repetitive copy-paste and common transcription errors. Native QuickBooks import works well when you need a quick single upload and can guarantee clean, correctly mapped CSVs.
Decision framework: choose native import or xtractor.app ⚖️
Choose native QuickBooks import for occasional, clean spreadsheets and choose xtractor.app for repeated email-driven workflows or mixed-format receipts. Below is a simple decision tree you can apply to your situation.
- Volume. If you process fewer than 50 rows once every few months, native QuickBooks import is faster. If you handle 50+ emails per week or daily streams, xtractor.app saves staff hours and reduces errors.
- Format variety. If all emails follow a single, consistent template, QuickBooks import will work with modest mapping work. If emails vary by vendor or contain different invoice formats, xtractor.app supports multiple parsing contexts and reusable filters to handle that variety.
- Staff time and cost. If pre-import cleanup costs your team more than 2–3 hours per week, xtractor.app typically recovers that time through automated parsing and scheduled exports to Google Sheets. For truly ad hoc imports, the setup time for a parser may not justify the savings.
- Compliance and audit needs. If you need audit trails, scheduled runs, and reusable parsing contexts for regulatory reviews, xtractor.app provides saved searches and change history that help maintain governance.
For a prescriptive walkthrough of parser setup and scheduling, see our Email Parser to Google Sheets: Fast Setup, Bulk Imports, and Scheduling (Step‑by‑Step). For examples that tie specific inbox filters to sheet rows, see Linking Emails to Google Sheets.
Side-by-side comparison table 🧾
The table below compares manual Google Sheets prep, native QuickBooks import, and xtractor.app on practical business factors you care about.
| Approach | Typical setup time | Recurring effort | Typical error modes | Mapping flexibility | Scheduling | Security controls | Typical hours saved/week (example) |
|---|---|---|---|---|---|---|---|
| Manual Google Sheets | 15–60 minutes per sheet. Low tech barrier. | High. Manual copy/paste, cleaning, and formula fixes every import. | Transcription errors, date format mismatches, missed columns. | High manual control but fragile across vendors. | None. | Controlled by whoever holds the sheet; risk if shared widely. | 0–2 hrs (small volume) |
| Native QuickBooks import | 10–30 minutes to map headers for a one-off. | Medium for repeated use: remapping and reformatting required. | Rejected rows due to header or currency mismatch; silent skips. | Limited to QuickBooks-required headers; fewer custom fields. | Import must be run manually. | Uses QuickBooks permissions; audit trail limited to import logs. | 0–3 hrs (ad hoc) |
| xtractor.app (our product) | 1–2 hours for initial parsing contexts and filters; less with templates. | Low. Scheduled parsing and exports keep sheets current. | Parsing mis-tags uncommon after tuning; vendor-format edge cases handled with multiple contexts. | High. Multiple parsing contexts and field mapping persist across runs. | Built-in scheduling and saved searches for daily/weekly runs. | Scoped Gmail filters, read-only Sheets accounts, saved parsing contexts and logs. | 3–15+ hrs (recurring/high volume) |
Each cell above shows practical business impact rather than technical minutiae. For a step-by-step guide to connect parsed data into Sheets and keep mappings stable, consult How to Automatically Export Emails to Google Sheets: A Step-by-Step Guide.
Security and governance for third-party parsing ⚠️
Third-party parsing requires scoped access controls, saved-filter hygiene, and audit-ready logs to limit data exposure. Control the blast radius by creating Gmail filters that forward only relevant messages to the parser, and avoid granting full mailbox access when possible.
- Access model. Use the least-privilege approach: read-only or delegated accounts for Sheets and service connections where possible. Where delegation is unavoidable, audit who has admin rights.
- Saved parsing contexts. Keep parsing contexts explicit and small; name them clearly and review them quarterly to remove stale rules that could surface old or irrelevant data. xtractor.app supports multiple contexts so you can separate vendors or departments.
- Audit trail and change management. Retain logs of scheduled runs, filter changes, and export snapshots for at least the length required by your compliance policy. Store raw parsed exports in a restricted folder before final imports.
- PII and sensitive fields. Mask or restrict access to personally identifiable information in both Sheets and QuickBooks exports. If you must parse sensitive attachments, request custom parsing plans that isolate attachments from general inbox parsing.
⚠️ Warning: Avoid granting full mailbox or broad Google Workspace scopes to parsing tools; prefer scoped filters and service accounts. Regularly revoke and reissue credentials when team members leave.
For operational checklists and practical filter examples, see How to Filter and Collect Emails into Google Sheets: A Step-by-Step Guide and our PDF Split feature page for scenarios that need attachment handling.

How to build an inbox-to-accounting pipeline: step-by-step using Xtractor.app and Google Sheets
Build the pipeline in four stages: capture, parse, map, and validate using xtractor.app and Google Sheets. This flow reduces manual entry and produces files ready for QuickBooks CSV import from Google Sheets or to import spreadsheet into Xero CSV supported entities. Below are concrete steps, reusable mapping guidance, scheduling tips, and a ranked troubleshooting checklist.
Stage 1 — Capture: target the right emails and set saved searches 📥
Create precise Gmail filters and saved searches so xtractor.app ingests only the messages you need. Use sender and subject filters to exclude newsletters and marketing mail and limit date ranges to the reporting window you plan to import. Example filters that reduce noise: from:invoices@vendor.com subject:(invoice OR receipt), from:payments@bank.com subject:(transaction OR debit), after:2025/01/01 before:2025/02/01.
Why this matters. Narrowing the inbox cuts false positives that create duplicate rows and downstream reconciliation work. For a small accounting team, reducing irrelevant messages can cut cleanup time from several hours per week to a few minutes.
How to implement quickly. Save 3–5 reusable searches in Gmail (by vendor, by incoming bank feed, and by billing notices). Point xtractor.app at the saved search during bulk import or schedule parsing for that specific saved search.
Related reading: see the guide on filtering and collecting emails into a spreadsheet in the Xtractor documentation for stepwise filter examples and sample Gmail queries: How to Filter and Collect Emails into Google Sheets: A Step-by-Step Guide.
Stage 2 — Parse: create parsing contexts and bulk-import emails 🔍
Set up multiple parsing contexts in xtractor.app so each email format (receipts, supplier bills, bank alerts) extracts consistent fields. Create one context per format variation and map the same logical fields across contexts: date, amount, invoice number, payee, tax, and currency.
Checklist for each parsing context:
- Confirm example emails: upload 5 representative messages per context.
- Define extraction fields: date, gross amount, tax amount, invoice number, vendor name, currency.
- Add normalization rules: trim whitespace, remove currency symbols, and standardize date tokens where possible.
Bulk import and scheduling. Use xtractor.app one-click bulk import for historical backfills and the scheduler for daily or hourly runs. For attachments note that default parsing does not extract text from attachments; contact xtractor.app support for a custom plan if you need attachment parsing.
Related reading: the step-by-step parsing and scheduling walkthrough shows template-based and AI-assisted contexts: Email Parser to Google Sheets: Fast Setup, Bulk Imports, and Scheduling (Step‑by‑Step).
⚠️ Warning: Attachments are not parsed by default. If your vendor emails place amounts only inside PDFs, request custom parsing to avoid missed transactions.
Stage 3 — Map and generate QuickBooks/Xero-ready CSVs (templates included) 🗂️
Map parsed columns to QuickBooks headers using a reusable mapping template and export as CSV formatted to the QuickBooks Import Excel and CSV Toolkit download and templates. Use the same sheet layout to produce files that match the import spreadsheet into Xero CSV supported entities for invoices, bills, or bank transactions.
Step-by-step mapping process:
- Copy the mapping template into a working Google Sheet.
- Align column names: map xtractor.app outputs (date, vendor, line amount, tax code, invoice_no) to QuickBooks header names exactly.
- Normalize values: convert date formats, ensure account names match your chart of accounts, and standardize currency codes.
- Run a 5-row export test using QuickBooks sample import tool or Xero sandbox to catch header or account mismatches.
- Save the mapping as a named sheet for reuse per vendor or entity type.
Practical example. For vendor bills, map xtractor.app field invoice_no to QuickBooks field ReferenceNo and vendor to VendorName. For Xero, include the AccountCode column and ensure tax rates match Xero tax names.
Related templates and mapping examples are available in the Google Sheets parsing guides and the Google Sheets extraction overview: Google Sheets to Extract Data with Xtractor.
Stage 4 — Validate, schedule, and monitor imports ⏱️
Run validation checks in Google Sheets, schedule xtractor.app automated imports, and mark rows that fail validation for quick review. Validation catches header typos, missing account names, duplicate invoices, and out-of-range dates before you upload to QuickBooks or Xero.
Essential validation checks:
- Header validation: confirm sheet headers match QuickBooks import headers exactly.
- Account lookup: compare vendor or account names against a master Chart of Accounts sheet and flag mismatches.
- Date range and format: ensure dates fall inside the period and match the format expected by the target import tool.
- Duplicate detection: flag duplicate invoice numbers and identical amount-date pairs.
Scheduling tips. For high-volume stores schedule xtractor.app to run daily after your bank or billing windows close. For low-volume operations a weekly run reduces noise and simplifies reconciliation.
💡 Tip: Always test with 5 to 10 representative rows and import to a sandbox company or test file first. That catches header and account-name issues without affecting live books.
Add a monitoring row. Include columns: ImportStatus, LastAttempt, ErrorMessage, RetryCount. This lets an accounts clerk scan failures and re-run corrected rows quickly.
Common troubleshooting checklist for import failures 🛠️
QuickBooks and Xero most often reject files for header typos, mismatched account names, incorrect date formats, and unexpected currency values. Use this ranked checklist to isolate the issue quickly.
- Header validation. Confirm every header matches the target system exactly. A single extra space or different capitalization can cause rejection.
- Account mapping. Verify vendor names and account codes against your master Chart of Accounts sheet. If QuickBooks returns an unknown account error, use the exact account name in your mapping.
- Date format and range. Convert dates to the format expected by QuickBooks or Xero and ensure no dates fall outside the import period.
- Currency codes. Match three-letter ISO codes when required and ensure mixed-currency rows are not present unless supported.
- Sample row testing. Export 5 rows and import them first to confirm success.
- Duplicate protection. Remove duplicate invoice numbers or mark them for manual review to avoid rejected rows.
- Error logging. Use the monitoring row to capture the import tool error message and map it to the checklist step to speed fixes.
If you hit persistent issues, compare a rejected CSV to the successful sample provided by QuickBooks or Xero and align headers and sample rows exactly. For recurring parsing problems with vendor formats, request a custom parsing context from xtractor.app support to reduce manual corrections.
Frequently Asked Questions
This FAQ answers common implementation, mapping, and troubleshooting questions for converting emails into QuickBooks- or Xero-ready CSVs using Google Sheets and xtractor.app. Use these responses to choose a workflow, avoid the most common import failures, and speed up setup with ready-made templates and checks.
Can I import a Google Sheets CSV directly into QuickBooks Online? 📥
Yes. Export your Google Sheet as a CSV that exactly matches QuickBooks’ required headers and upload it with QuickBooks’ Import Data tool. QuickBooks enforces specific header names and account references, so start with a validated template and confirm header spellings before upload. Use xtractor.app to export parsed email fields directly into a sheet formatted to those headers to avoid manual rework. For a full setup walkthrough, see the Email Parser to Google Sheets step-by-step guide from xtractor.app.
How do I map parsed email fields to QuickBooks columns? 🔁
Create a one-row mapping sheet that pairs each parsed email field with the exact QuickBooks header name and have xtractor.app write parsed values into the mapped columns. Example mapping: email_subject -> Description, order_number -> Invoice Number, total_amount -> Amount, date_received -> Transaction Date. Keep a copy of the mapping template in the same folder as your export so accountants can change mappings without touching parsing rules. Use the step-by-step parsing guide to build and reuse mapping contexts across email formats.
What are the most common reasons QuickBooks rejects a CSV import? ❌
Missing required headers, invalid date or amount formats, and account names not matching the company chart of accounts cause most QuickBooks import failures. Example errors include dates in DD/MM/YYYY when QuickBooks expects MM/DD/YYYY and account names spelled differently from the chart. Run pre-import validation in Sheets (date parsing, numeric coercion, account lookup) to catch these before you upload.
⚠️ Warning: QuickBooks will reject rows where an account or customer name does not match exactly; use a VLOOKUP or lookup table to convert vendor names to your chart names before export.
Xtractor.app can standardize date and amount formats during parsing so fewer rows fail validation.
Can Xtractor.app handle thousands of emails and scheduled imports? 🚀
Yes. Xtractor.app supports one-click bulk imports and scheduled parsing jobs that process large inbox volumes and recurring workflows. Use saved searches and filters to scope which messages to parse, set multiple parsing contexts for varied email formats, and schedule daily or hourly runs for continuous ingestion. For attachments or non-standard formats, request custom parsing from Xtractor.app to avoid missed data and manual fixes. See the fast setup and scheduling guide for configuration details.
How do I import a spreadsheet into Xero CSV supported entities? 📄
Match your Google Sheet columns to Xero’s required headers for the specific entity and verify mappings in Xero’s import preview before finalizing the upload. Xero supports CSV imports for contacts, invoices, bills, and bank transactions; each entity has its own required fields and accepted formats. Use xtractor.app to shape parsed output to Xero templates and test with a small batch first to confirm tax rates, contact codes, and bank reference fields map correctly. Search for import spreadsheet into Xero CSV supported entities when preparing entity-specific templates.
Where can I get QuickBooks Import Excel and CSV Toolkit download and templates? 📂
QuickBooks publishes the Import Excel and CSV Toolkit and official templates on its support site for common entities such as invoices, customers, and products. Store the official toolkit files in your mapping folder and adapt xtractor.app’s parsed output to those templates to reduce mapping errors. Version your templates so you can trace when header changes or company chart updates affect imports. Link your mapping sheet to the toolkit copy so you always export with the current header set.
Can I automate daily bank transaction imports from email receipts? ⏱️
Yes. Configure xtractor.app to run a scheduled parsing job, deliver cleaned rows to a Google Sheet, validate rows automatically, and export a CSV for QuickBooks or Xero imports. A recommended sequence:
- Create a saved search or filter to capture only bank transaction emails.
- Build parsing contexts in xtractor.app and map fields to a validated Google Sheet template.
- Add Sheets validation rules (date, amount, account lookup) and conditional formatting to flag exceptions.
- Schedule xtractor.app to append new rows daily and have a script or manual step export the validated sheet as CSV.
- Maintain a monitoring sheet that shows flagged rows and a daily summary of parsed vs. accepted rows.
Automating this way reduces bookkeeping hours and lowers the risk of missed transactions.
For setup examples and scheduling details, consult the Email Parser to Google Sheets guide and the automatic export walkthrough from xtractor.app. If you need help mapping uncommon email formats, see the linking emails guide or request a custom parsing plan.
Recommended next steps for converting inbox emails into bookkeeping-ready CSVs.
Choose a parser-plus-spreadsheet workflow so you stop losing hours to manual copy-paste and reduce costly transcription errors. Implementing a small set of parsing contexts and a consistent field map gets you to a QuickBooks CSV import from Google Sheets in hours instead of days. For a practical setup, follow the step-by-step setup guide to configure parsing contexts and scheduling in Google Sheets.
Xtractor.app is an email parsing and data-extraction tool that pulls structured text out of emails and exports it directly into Google Sheets, CSV, or Excel. The product is designed to import thousands of emails in a single action or on a scheduled cadence, parse relevant fields (subject, sender, date, amounts, order numbers, etc.), and produce a clean, tabular output in a spreadsheet for reporting, analysis, or bookkeeping.
Schedule a consultation with xtractor.app to map your email formats and test a sample export. If you want implementation details, see the step-by-step guide for Email Parser to Google Sheets and the Linking Emails to Google Sheets article for filtering and automation best practices.
💡 Tip: Start by mapping five representative email examples to the target QuickBooks columns before bulk importing.