A single misread order number in email exports can force three hours of manual cleanup per week for small e-commerce teams. gmail to google sheets is a workflow that extracts structured fields from messages and writes them into a spreadsheet for reporting and bookkeeping. Xtractor.app parses subject, sender, dates, amounts, and order numbers from large inboxes and exports clean tables to Google Sheets, CSV, or Excel. This templates-downloads post offers seven free, brand-specific gmail to google sheets templates and step-by-step setup for xtractor.app users to map fields, apply saved filters, and schedule imports. Consult our step-by-step no-code tutorial, the beginner’s guide to no-code email-to-sheet automation, or the Apps Script parsing guide to pick the template that could shave hours off your daily reconciliation.
A set of seven ready-to-use Gmail to Google Sheets templates covers orders, receipts, payouts, and daily summaries.
These seven templates provide drop-in spreadsheet layouts that standardize columns, example rows, and parsing rules so exports from Gmail arrive in a consistent table. Each template lists expected email inputs, a one-row example, a download area, and a pointer to our xtractor.app step-by-step mapping tutorial so you can map fields and start imports in minutes.
Template structure and canonical columns 🧭
A gmail to google sheets template is a spreadsheet layout that defines canonical columns, sample rows, and parsing rules so different senders map to the same output. Our canonical column set across the gallery is: date, sender, subject, order_number, invoice_number, payout_id, amount, net_amount, fees, tax, currency, payment_method, shipping, line_items, channel, customer_email, ticket_id, priority, status. Use these exact column names in your Sheets and xtractor.app field maps to avoid mismatches. For each template we include a header row, one sample parsed row, and a hidden “field_map” sheet you can copy into your workbook for xtractor.app mapping.
⚠️ Warning: xtractor.app does not parse attachments by default. If you need attachments parsed, request custom parsing from our support team before you start bulk imports.
Download: step-by-step mapping tutorial and template downloads for a complete walk-through of field mapping and saving a copy to Drive.
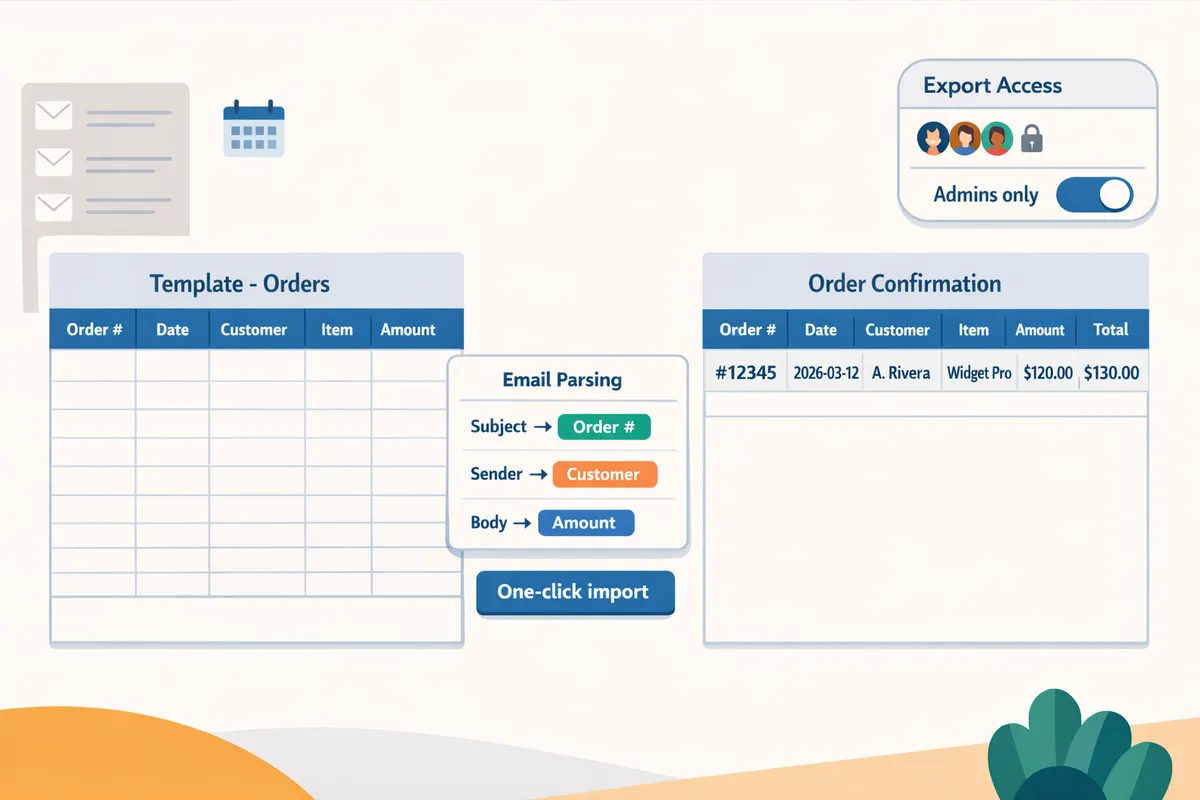
Order confirmation template 📦
Order confirmation template captures order number, order date, buyer details, item lines, subtotal, tax, shipping, and total. Use this template for e-commerce confirmations that list each SKU, price, and quantity. Map the email subject or body fragment containing “Order #” to order_number and parse line_items either as a single text cell or split into separate rows using xtractor.app multiple parsing contexts. Common variations include single-line item lists versus HTML tables; add a second parsing context in xtractor.app to handle the table format.
Sample extracted row:
| date | sender | subject | order_number | customer_email | line_items | subtotal | tax | shipping | total | currency |
|---|---|---|---|---|---|---|---|---|---|---|
| 2026-03-12 | orders@shop.com | Your Order #12345 | 12345 | jane@example.com | 1x Blue T-Shirt ($19.99) | 19.99 | 1.60 | 4.00 | 25.59 | USD |
Download: Use the template copy in the tutorial and follow the order-specific mapping steps in our step-by-step mapping tutorial. xtractor.app supports bulk imports for thousands of confirmations at once and saved searches to target order folders.
Receipt and expense template 💳
Receipt and expense template extracts merchant, gross amount, tax, payment method, and an expense flag for bookkeeping imports. Map “Total:” to amount and separate tax when present; put payment method into payment_method for credit card reconciliation. For bookkeeping, include reimbursable boolean values in a column named reimbursable so your accounts team can filter quickly. When email totals use locale formats, normalize currency by mapping the currency symbol into currency and using a Sheet formula to convert commas to decimal points before import when necessary.
Sample extracted row:
| date | sender | merchant | amount | tax | currency | payment_method | reimbursable |
|---|---|---|---|---|---|---|---|
| 2026-02-05 | receipts@merchant.com | Field Supply Co. | 187.50 | 15.63 | USD | Visa xxxx4242 | TRUE |
Download: Copy the receipt template from our tutorial and follow the recommended field splits in the tutorial to keep gross and tax in separate columns. xtractor.app can apply regex-free filters to isolate the line with “Total” or “Amount charged.”
Payouts and marketplace template 🧾
Payouts and marketplace template captures payout_id, payout date, gross, fees, net_amount, and channel so you can reconcile deposits against bank statements. Map marketplace emails that list multiple transactions into separate rows by using a parsing context per payout line, and keep numeric columns formatted as numbers for SUM and reconciliation functions. For batched payouts, include a batch_id column and a row per transaction so you can trace which orders contributed to a single deposit.
Sample extracted row:
| payout_date | sender | payout_id | gross | fees | net_amount | currency | channel |
|---|---|---|---|---|---|---|---|
| 2026-03-01 | payouts@market.com | P-987654 | 1250.00 | 37.50 | 1212.50 | USD | Marketplace A |
Download: Use the payouts template in the tutorial and map numeric columns in xtractor.app to avoid text imports. xtractor.app supports scheduled imports so your payouts sheet updates automatically on payout day.
Daily revenue summary template 📊
Daily revenue summary aggregates parsed order rows into daily totals by channel using a minimal, pivot-ready layout of date, net_amount, tax, and channel. This template expects your order confirmation exports to append individual order rows to a raw sheet and then uses a pivot table or SUMIFS to produce daily totals. A simple formula example: =SUMIFS(raw!net_amount, raw!date, A2, raw!channel, “Online Store”) produces the channel subtotal for date in A2.
Pivot-ready columns to keep: date, net_amount, tax, channel, order_number. xtractor.app scheduling can append new orders into the raw sheet on a nightly cadence so the summary updates without manual copy-paste. For a one-sheet approach include a raw tab and a summary tab with a pivot table that uses the raw tab as the source.
Sample pivot row:
| date | channel | total_net | total_tax |
|---|---|---|---|
| 2026-03-12 | Online Store | 3,412.75 | 270.34 |
Download: Start with the daily-summary template in the tutorial and follow the scheduling section in our Email Parser to Google Sheets: Fast Setup, Bulk Imports, and Scheduling (Step‑by‑Step) guide to run nightly imports.
Support ticket and lead inbox template 📨
Support ticket and lead inbox template captures ticket_id, customer_email, subject, priority, and status so you can route issues and track SLAs in Sheets. Map headers like “Message-ID” or subject prefixes (e.g., “[Ticket #123]”) to ticket_id and pull the From header into customer_email. To keep threads compact, parse the latest message date and include a thread_id column generated from subject normalization. This layout supports simple SLA formulas that count open tickets older than X hours.
Sample extracted row:
| date | ticket_id | customer_email | subject | priority | status |
|---|---|---|---|---|---|
| 2026-03-15 14:22 | T-2210 | alex@shop.com | Issue with order 12345 | High | Open |
Download: Use the support-ticket template in the tutorial and apply saved searches in xtractor.app to target labels or sender addresses for routing.
Refunds and returns template 🔁
Refunds and returns template captures refund_id, original_order, refunded_amount, refund_date, reason, and restocking_fee to reconcile returned funds and inventory adjustments. Map lines containing “Refund” or “Return ID” to refund_id and include the original order_number for traceability. For partial refunds capture refunded_amount and remaining_balance to detect under- or over-refunds quickly.
Sample extracted row:
| refund_date | refund_id | order_number | refunded_amount | reason | restocking_fee | currency |
|---|---|---|---|---|---|---|
| 2026-03-10 | R-440 | 12345 | 19.99 | Defective | 0.00 | USD |
Download: Grab the refunds template from the tutorial and add a reconciliation column if you compare against bank deposit lines. xtractor.app can split batched refund emails into multiple rows using parsing contexts.
Field-mapping example table
This table shows how common parsed email snippets map to our canonical template columns so you can copy it into a hidden field_map sheet for xtractor.app. Copy the header and mapping rows exactly into a sheet called field_map to reuse across templates.
| Email snippet example | Parsed text to extract | Template column name |
|---|---|---|
| Order #12345 | 12345 | order_number |
| Total: $25.59 | 25.59 | total (or amount) – map to amount or net_amount as needed |
| Tax: $1.60 | 1.60 | tax |
| Payout ID: P-987654 | P-987654 | payout_id |
| Payment method: Visa ending 4242 | Visa ending 4242 | payment_method |
| Ticket #T-2210 | T-2210 | ticket_id |
| Refund ID: R-440 | R-440 | refund_id |
Recommendation: copy this table into a hidden sheet and use it as the canonical reference when creating xtractor.app field maps. For mapping guidance follow our step-by-step mapping tutorial.
Template selection checklist
This checklist helps you pick the right template based on business constraints, email format, and reporting needs.
- Volume. Choose a template and xtractor.app import schedule that matches email volume. High-volume stores need bulk imports and saved searches to avoid rate limits.
- Consistent layout. Prefer a template when sender emails keep a predictable structure; if layouts vary, add parsing contexts in xtractor.app or expect manual cleanup.
- Attachment needs. If PDFs or invoices attach to emails, plan for custom parsing; xtractor.app handles attachments on request but not in the default flow.
- Reconciliation frequency. If you reconcile daily, pick the daily revenue summary and enable scheduled imports so totals appear before daily closing.
- Privacy constraints. For PII or payment data, restrict the template spreadsheet access and use xtractor.app account controls to limit who can view exports.
💡 Tip: Test any template with 50 sample emails first. That reveals edge cases—different currency formatting, missing tax lines, or alternate subject prefixes—before you scale to bulk imports.
Related setup guides: For a full no-code setup and mapping walkthrough see our Gmail to Google Sheets Automatically: The Beginner’s Guide to No-Code Email-to-Sheet Automation. To learn advanced scheduling and bulk imports, read Email Parser to Google Sheets: Fast Setup, Bulk Imports, and Scheduling (Step‑by‑Step).
Use xtractor.app to map fields, apply filters, test on sample emails, and schedule automated imports for daily reporting.
Follow a four-step workflow in xtractor.app: import a template, define filters, validate parsing, and schedule imports. This workflow turns a downloaded Gmail to Google Sheets template into live, repeatable imports that save time and reduce transcription errors. For a full walkthrough, see our no-code tutorial and the beginner’s guide to no-code email-to-sheet automation.
Import the template and run a one-click bulk import to populate rows from historical emails ▶️
Upload the template into xtractor.app, choose the mailbox or Gmail label, set a date range, and run one-click bulk import to backfill historical rows. 1) Open the template in xtractor.app and confirm the column mapping matches the template headers. 2) Select the Gmail account and the label (for example, Orders or Receipts). 3) Limit the import to a date range (last 30 days, quarter, or custom range) to avoid overloading the sheet. 4) Run Bulk Import and watch extracted rows stream into the target Google Sheet.
Running bulk import avoids manual copy-paste for large inboxes and recovers weeks of work in minutes; our step-by-step tutorial explains the same scenario for high-volume order exports.
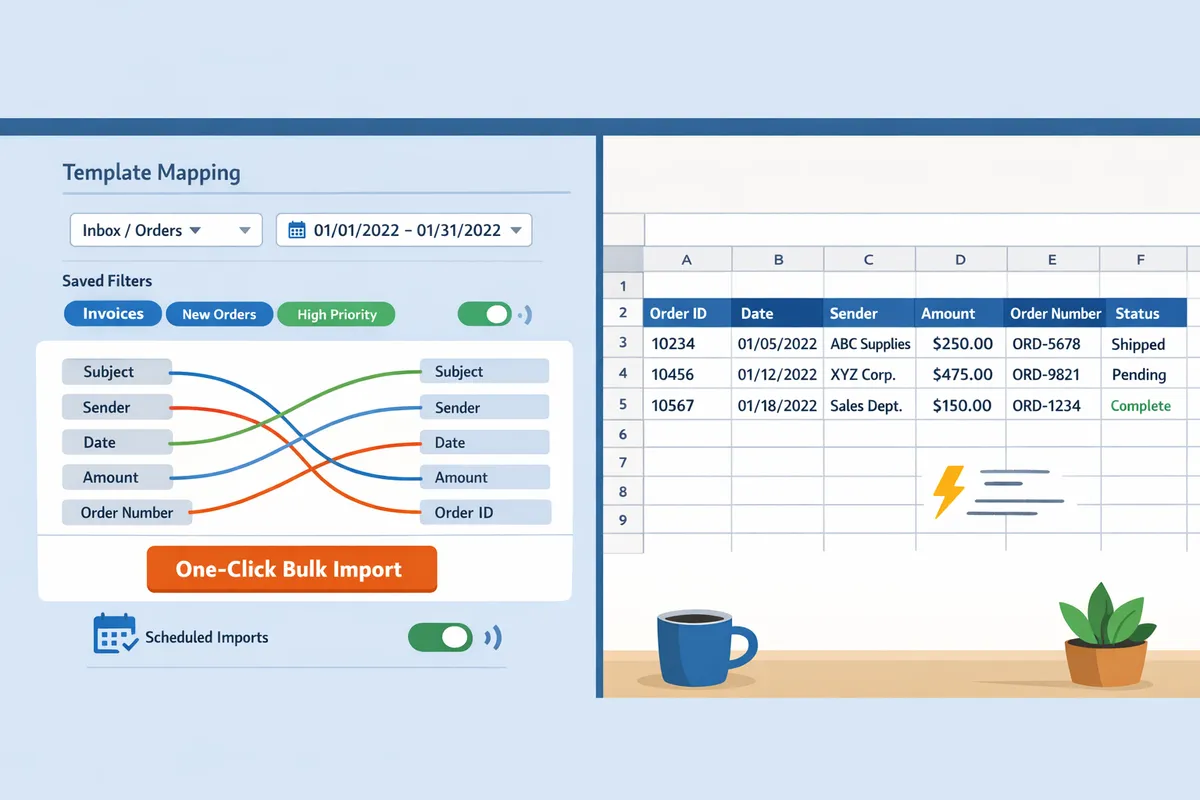
Define filters and saved searches to export gmail emails to google sheets for only the messages you need 🔎
Create filters in xtractor.app (sender, subject keywords, date ranges, and Gmail labels) and save them as reusable searches to target only the emails you need. Typical filter examples: set sender to receipts@marketplace.com, subject contains Order #, label equals Paid, or date between two values. Save each combination as a named search (for example, Orders – Shopify) so recurring exports use the exact same criteria.
Saved searches reduce setup time for weekly or daily exports and make audits simpler because the same query runs every time. For filter setup examples and best practices, review our beginner’s guide on no-code email-to-sheet automation.
Test and validate parsed rows against source emails before scheduling recurring imports ✅
Spot-check a representative sample in xtractor.app by validating parsed rows against their source messages and add parsing contexts until fields match. Pick 10 diverse emails that include different layouts, currencies, and time zones. Verify that order numbers, amounts, and dates parse correctly and that date parsing handles timezone offsets.
If a field mismatches, add a second parsing context in xtractor.app to handle the alternate layout and re-run the sample import. Monitor daily for the first week after scheduling and log any mismatches in a lightweight monitoring sheet so you can track fixes over time.
💡 Tip: Run a weekly sample import into a sandbox sheet before applying changes to live bookkeeping sheets.
Note: attachments are not parsed by default; contact xtractor.app support for custom attachment parsing if your invoices or CSVs arrive as attachments.
Schedule automated imports and set simple alerts for failures or schema changes
Schedule imports in xtractor.app at the cadence you need (hourly, daily, or weekly) and enable email alerts for failed imports and schema errors. Choose a daily run time that aligns with your reporting window (for example, 06:00 to include previous-day receipts). Enable the built-in failure notifications so the team receives an email if an import stops or a parsing rule breaks.
Create a lightweight monitoring sheet that logs import timestamp, rows_added, and errors. Use a simple rule: if daily rows differ from the 7-day moving average by more than 30%, flag the row and send an email alert. For step-by-step scheduling instructions and advanced options, see our how-to guide on exporting emails to Google Sheets automatically without coding.
Customize templates by adding parsing contexts, extra columns, verification rules, and security controls to match varied email layouts and reporting needs.
Extend templates to handle format variation, add calculated fields, validate parsed values, and enforce PII controls before data lands in Sheets. This prevents routine cleanup, reduces audit risk, and keeps reporting accurate across sellers, marketplaces, and support workflows. Use xtractor.app to add multiple parsing contexts, schedule imports, and limit raw email text exports so the spreadsheet contains only the fields you need.
No-code (xtractor.app) vs Apps Script vs Manual copy-paste 🧭
No-code tools like xtractor.app deliver faster time-to-value while Apps Script gives deeper customization at the cost of higher maintenance. Below is a practical comparison to help choose the right path for low-volume teams or audit-heavy workflows.
| Approach | Time-to-value | Ongoing maintenance (hrs/week) | Typical cost | Best fit |
|---|---|---|---|---|
| xtractor.app (no-code) | Hours to one business day. | 0.5–3 hours. | Low to moderate monthly subscription. | Small teams that need fast, repeatable imports and scheduled runs. |
| Apps Script (scripting) | Several days for a robust setup. | 2–6 hours. | Low upfront, higher developer time cost. | Teams needing custom transforms or proprietary workflows and full control. |
| Manual copy-paste / CSV | Immediate but slow. | 4–20+ hours. | Low direct cost, high labor cost. | Ad-hoc exports or one-off audits where automation doesn’t pay off. |
For a step-by-step no-code walkthrough, see our guide: Gmail to Google Sheets Automatically: The Beginner’s Guide to No-Code Email-to-Sheet Automation. If you prefer scripting, review the Apps Script options in How to Integrate Google Sheets with Gmail.
Add parsing contexts to handle variant email layouts 📐
A parsing context is a layout-specific template that tells xtractor.app where to find fields in a given email format. Create one context per distinct layout (for example, marketplace table receipt versus single-line summary) and order contexts by priority so the most common layout runs first.
How to add contexts (practical steps).
- Collect 5–10 representative sample emails for each layout.
- In xtractor.app create a new parsing context and name it (for example, Table receipt – Etsy).
- Map fields: example fields are order_id, order_date, buyer_email, item_sku, gross_amount, fees, net_amount.
- Test the context on three samples and adjust field anchors until extraction matches expected cells.
- Set context priority so a specialized context runs before a generic fallback.
Example: use one context for table-style receipts that locate rows by column header (Item, Qty, Price) and a second context for confirmation emails that contain a single-line summary like Order ORD-12345 — Total: 45.67. Adding both contexts reduced missed fields in our template tests.
For a full how-to on mapping fields and scheduling, see How to Export Emails to Google Sheets Automatically Without Coding (Step-by-Step Tutorial).
Implement error handling, monitoring, and reliability checks to avoid manual rework ⚠️
Set up row-level validation, an import log sheet, scheduled retries, and alerts to catch parsing failures before they cause hours of reconciliation. These checks stop bad rows from entering your reports and give visibility when patterns change.
Practical checks to implement.
- Row-level validation formulas. Example: ensure total_amount > 0 and currency matches expected code. Mark invalid rows in a status column.
- Import log sheet. Record import timestamp, source filter, rows imported, and parsing context used.
- Scheduled retries. If an import returns zero rows for a known label, schedule an automatic retry or run a diagnostic sample.
- Alerts. Send an email or Slack message when imports drop below expected thresholds or when the status column shows >2% invalid rows.
⚠️ Warning: Missing monitoring creates hours of manual reconciliation and can hide lost revenue from skipped or duplicated imports.
xtractor.app supports scheduling and saved searches so you can automate retries and capture the context used for each run. Add the import log sheet to your template so each automated run appends a single diagnostic row for audit tracing.
Security and compliance for SMBs: restrict access, mask PII, and set retention rules 🔒
Restrict sheet sharing to named accounts, mask or hash sensitive columns, and keep parsed email text only for the minimum retention period required by policy. These steps reduce accidental exposure and help during audits.
Specific actions to apply now.
- Share only with named Google accounts and remove link-sharing. Use viewer-only access for finance reviewers who do not need edit rights.
- Mask or hash PII columns. Instead of storing full email bodies, store a redacted column (last four digits of a card, obfuscated email). If you must store raw text, move it to a protected tab and grant access sparingly.
- Retention rules. Define a retention period and implement a sheet cleanup job or scheduled export that deletes or archives rows older than your policy allows.
- Document the workflow. Add an internal runbook with context names, example emails, who can restore data, and steps to revoke access.
💡 Tip: Configure xtractor.app to map only required fields and avoid exporting full message bodies unless necessary for compliance or dispute resolution.
See our security checklist and connection patterns in How to Connect Google Sheets to Gmail.
Examples: adapting templates for marketplaces, expense automation, and support ticket exports 📄
Adapting templates usually means adding 3–6 precise columns and a parsing-context tweak per use case. Below are ready-to-apply examples.
- Marketplace payouts (marketplaces)
- Columns to add: marketplace, order_id, sku, buyer_email, gross_amount, marketplace_fees, net_amount, payout_date.
- Parsing-context change: add a context that recognizes vendor-specific headers like Seller payout or table headers (Gross, Fees, Net).
- Business consequence of mistakes: mis-recorded fees inflate net revenue, creating downstream reconciliation gaps with payout statements.
- Expense automation (receipts)
- Columns to add: vendor_name, expense_date, amount, currency, expense_category, tax_amount, merchant_reference.
- Parsing-context change: add one context for emailed PDF text (if OCR provided) and a fallback context for plain-text merchant receipts.
- Business consequence of mistakes: mis-keyed amounts lead to incorrect expense reports and potential audit issues.
- Support ticket exports (tickets)
- Columns to add: ticket_id, sender_email, subject_line, label, priority, created_at, resolved_at, resolution_summary.
- Parsing-context change: one context for automated system emails (ticket templates) and one for customer replies that embed issue descriptions.
- Business consequence of mistakes: duplicate rows or missing ticket IDs break SLA reporting and inflate workload estimates.
Attachments are not parsed by default; if you need receipts from attachments, open a custom parsing request with xtractor.app. For more mapping patterns and starter templates, consult Email Parser to Google Sheets: Fast Setup, Bulk Imports, and Scheduling (Step-by-Step).
Get these templates into a live workflow
Apply a template to parse order, receipt, and daily-summary emails and append clean rows to a spreadsheet in minutes. These ready-to-use gmail to google sheets templates reduce hours of manual entry and speed reporting for small ecommerce and bookkeeping teams.
Xtractor.app is an email parsing and data-extraction tool that pulls structured text out of emails and exports it directly into Google Sheets, CSV, or Excel. Use Xtractor.app to run a one-click bulk import or schedule daily imports so your sheet stays current without copying and pasting.
Download the 7 Gmail-to-Google-Sheets templates and follow the step-by-step setup in our export guide to finish the import in under an hour: download the templates and tutorial. For scaling tips and reusable parsing patterns, see the Beginner’s Guide to no-code email-to-sheet automation.
💡 Tip: Test each template against a labeled sample of 10–20 emails before running a bulk import to catch formatting variations.